Blog 2 - AWS Public & Private Subnets with NAT Instance — Free-Tier Tutorial
Now that your AWS account is ready, let’s put that knowledge into practice. In this tutorial, we’ll build a VPC from scratch — including public and private subnets, a NAT instance, and EC2 instances — in a free-tier friendly way. You’ll follow each step and understand how subnets, route tables, security groups (SGs), Internet Gateway (IGW), and NAT instances work together to control network traffic and enable secure Internet access in a real AWS environment. By the end, you’ll have hands-on experience experimenting safely without incurring charges.
💡 Tip: If you haven’t set up your AWS account ye, check out Blog 1: Introduction to AWS Networking Basics for a step-by-step guide — AWS also provides free-tier access to make learning risk-free.

Preparation: Setting Up for Success
Before starting the lab, a few setup checks will save time and prevent surprises. Ensuring you have the right permissions, choosing an appropriate AWS region, and being mindful of service limits will make your experience smoother and help avoid unexpected charges.
Here’s what to do:
- Log in with an IAM user: Using an IAM user with administrator permissions allows you to create VPCs, subnets, route tables, EC2 instances, and NAT configurations without permission errors.
- Select an AWS region: I’ll use us-east-1 (N. Virginia), but any region that supports free-tier EC2 instances works for this lab.
💡 Tip: Regularly monitor your AWS usage to identify leftover resources, especially EC2 or NAT instances, to prevent unexpected costs.

Create a VPC
VPC (Virtual Private Cloud) is your isolated network in AWS. It defines the IP address range for all subnets and resources. Planning your CIDR wisely ensures you have enough IPs and avoids conflicts later. All subnets, route tables, and gateways live inside a VPC. Without it, resources cannot communicate or be properly segmented.
💡 Tip: Use a /16 CIDR (e.g., 10.0.0.0/16). This provides over 65,000 IP addresses — more than enough for multiple subnets.
Steps
- Go to VPC → Your VPCs → Create VPC
- Set the following:
- Name: LabVPC
- IPv4 CIDR: 10.0.0.0/16
- Tenancy: Default
- Click Create VPC
Pro Insight: The VPC defines the routing scope for all subnets, route tables, and gateways. Choosing it thoughtfully simplifies the rest of the lab.

Create Subnets
A subnet is considered public when its route table sends Internet-bound traffic to an Internet Gateway (IGW). If it lacks that route and instead uses a NAT device for outbound traffic, it is treated as private.
- Public subnet: Direct Internet access through an Internet Gateway (IGW).
- Private subnet: No direct Internet access; traffic flows through a NAT instance for controlled access.
💡 Tip: Assign subnets to specific Availability Zones (AZs) for consistency.
2a. Create a Public Subnet
Steps
- Go to VPC → Subnets → Create Subnet
- Set the following:
- Name:
PublicSubnet - VPC:
LabVPC - AZ: Choose preferred
- IPv4 CIDR:
10.0.1.0/24
- Click Create Subnet

Pro Insight: Resources that need direct Internet access, like web servers, go here. Subnets themselves do not incur charges.
2b. Create a Private Subnet
Steps:
- Go to VPC → Subnets → Create Subnet
- Set the following:
- Name: PrivateSubnet
- VPC: LabVPC
- AZ: Choose as preferred
- IPv4 CIDR: 10.0.2.0/24
- Click Create Subnet

Pro Insight: Private subnets isolate resources from direct Internet access. Any outbound traffic will pass through a NAT instance, ensuring controlled connectivity.
Create an Internet Gateway (IGW)
An Internet Gateway (IGW) provides your VPC with Internet connectivity. Only subnets whose route tables point to the IGW can send or receive Internet traffic.
Steps to create IGW:
- Go to VPC → Internet Gateways → Create IGW
- Name it LabIGW
- Attach to LabVPC
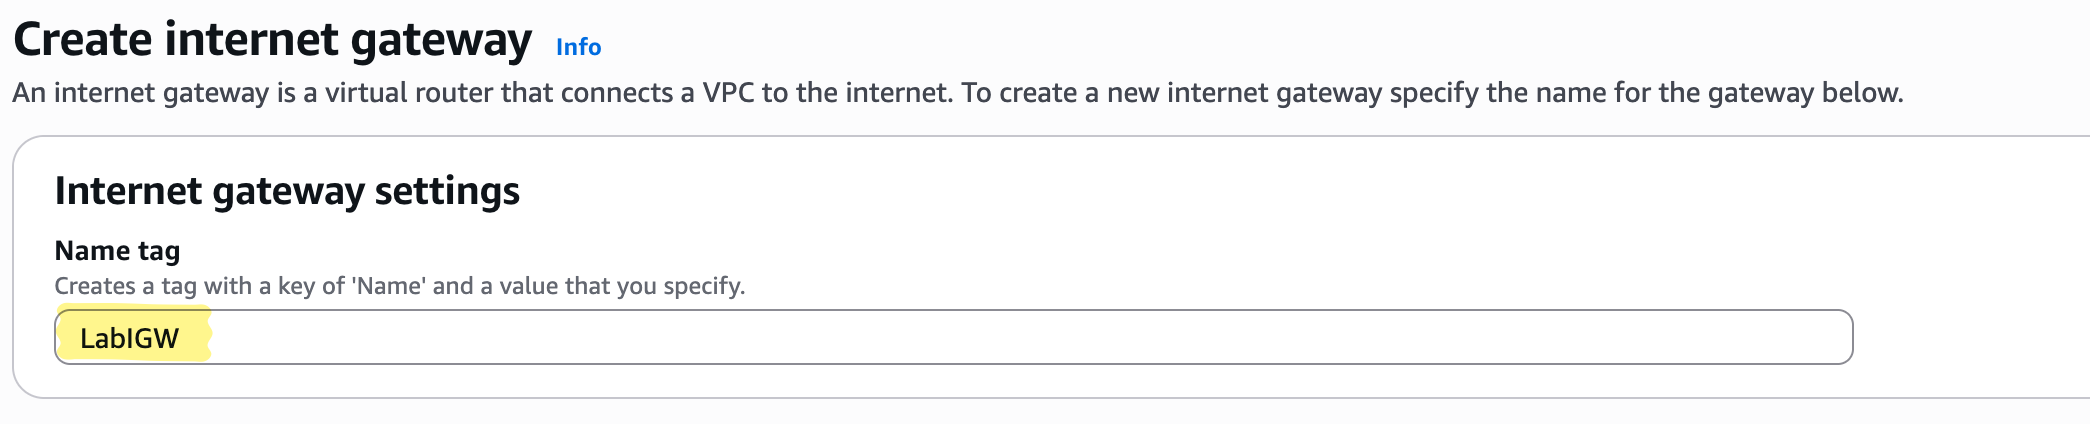
Pro Insight: Attaching the IGW enables Internet access for public resources. This is a free-tier safe operation; charges only occur when instances send traffic.
Configure Route Tables
Route tables control the flow of traffic within the VPC. A public route table sends 0.0.0.0/0 to the IGW, while a private route table sends it to a NAT device. This routing behavior is what determines whether a subnet is public or private.
Routing Overview
- Public subnet: 0.0.0.0/0 → IGW
- Private subnet: 0.0.0.0/0 → NAT instance (we will configure it later)
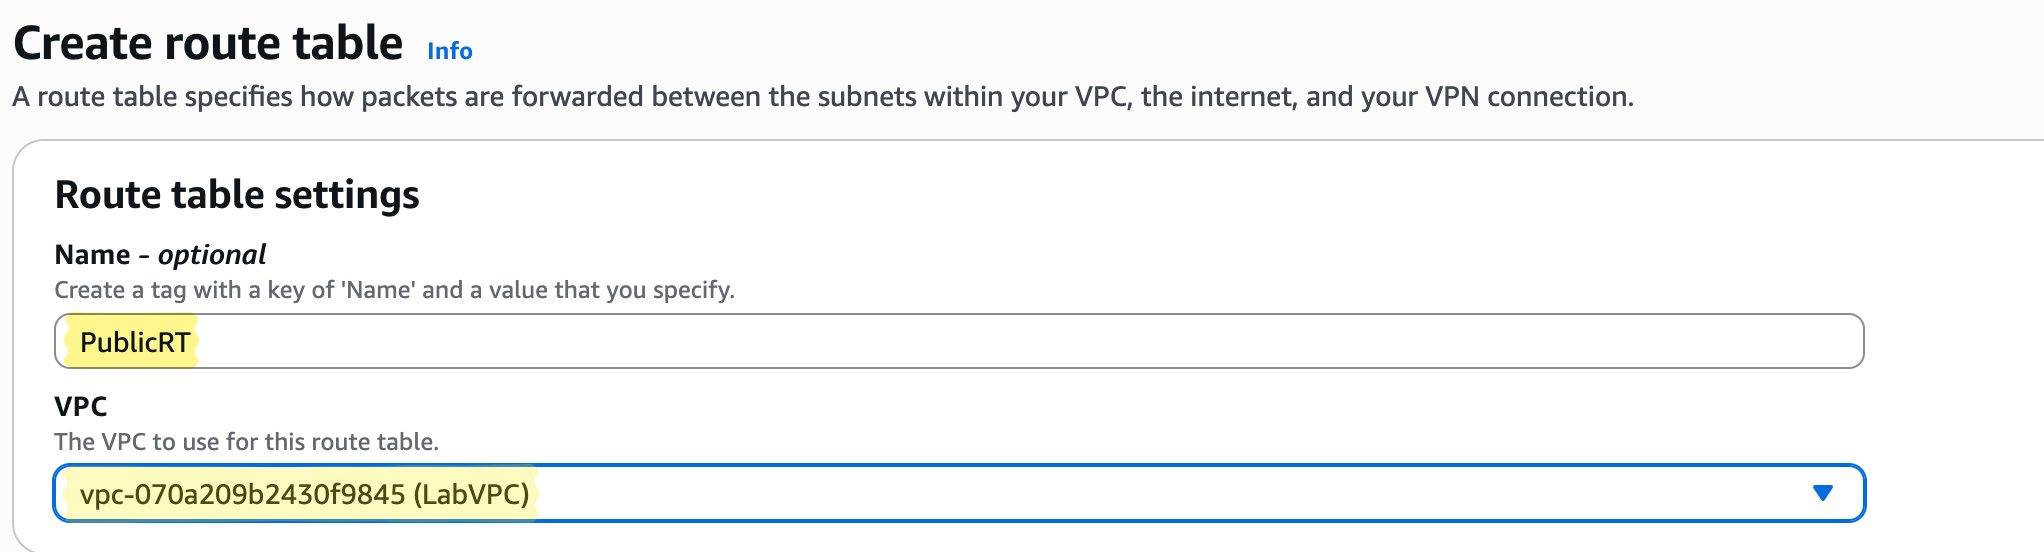
4a. Public Route Table
Steps:
- Go to VPC → Route Tables → Create Route Table
- Name: PublicRT
- VPC: LabVPC
- Add route: 0.0.0.0/0 → LabIGW
- Associate with PublicSubnet


Pro Insight: Public resources now have Internet access.
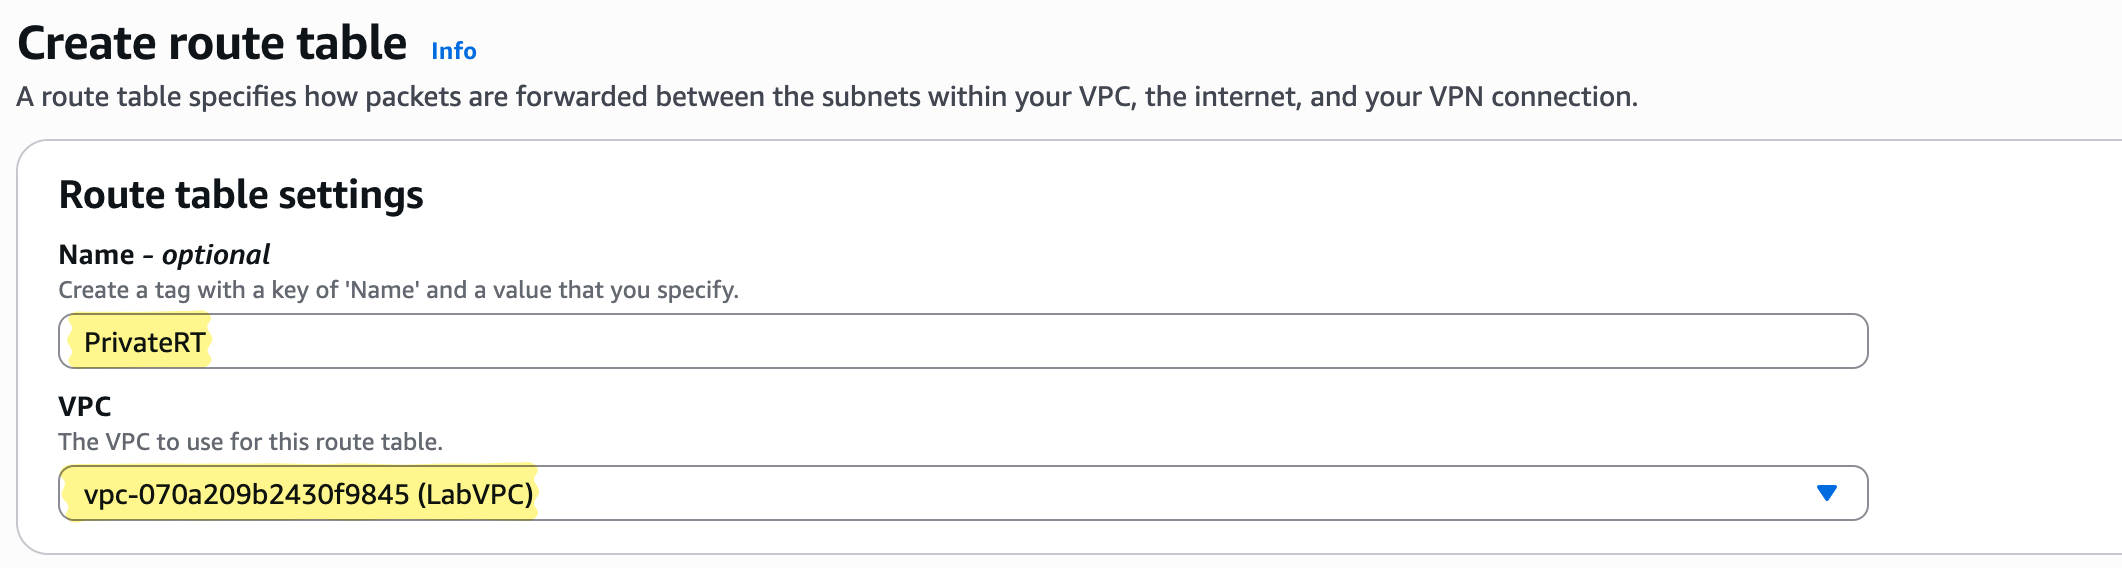
4b. Private Route Table
Steps:
- Go to VPC → Route Tables → Create Route Table
- Name: PrivateRT
- VPC: LabVPC
- Do not add an Internet route yet, we will add after NAT instance is configured
- Associate with PrivateSubnet

Pro Insight: Private resources remain isolated until the NAT instance is configured.
Launch EC2 Instances
We will use one public EC2 as a bastion/NAT instance and one private EC2 to test connectivity. Security groups define who can connect to whom. Public instance can access Internet directly; private instance can only access Internet via NAT.
5a. Public EC2
Steps:
- Launch t3.micro (free-tier)
- Set
- Name: PublicEc2
- Key pair: Create/download Public-Ec2-keypair.pem
- VPC: LabVPC, Subnet: PublicSubnet, Auto-assign Public IP: Enable
- Security group: Allow SSH (22) from public IP only
- Click Launch


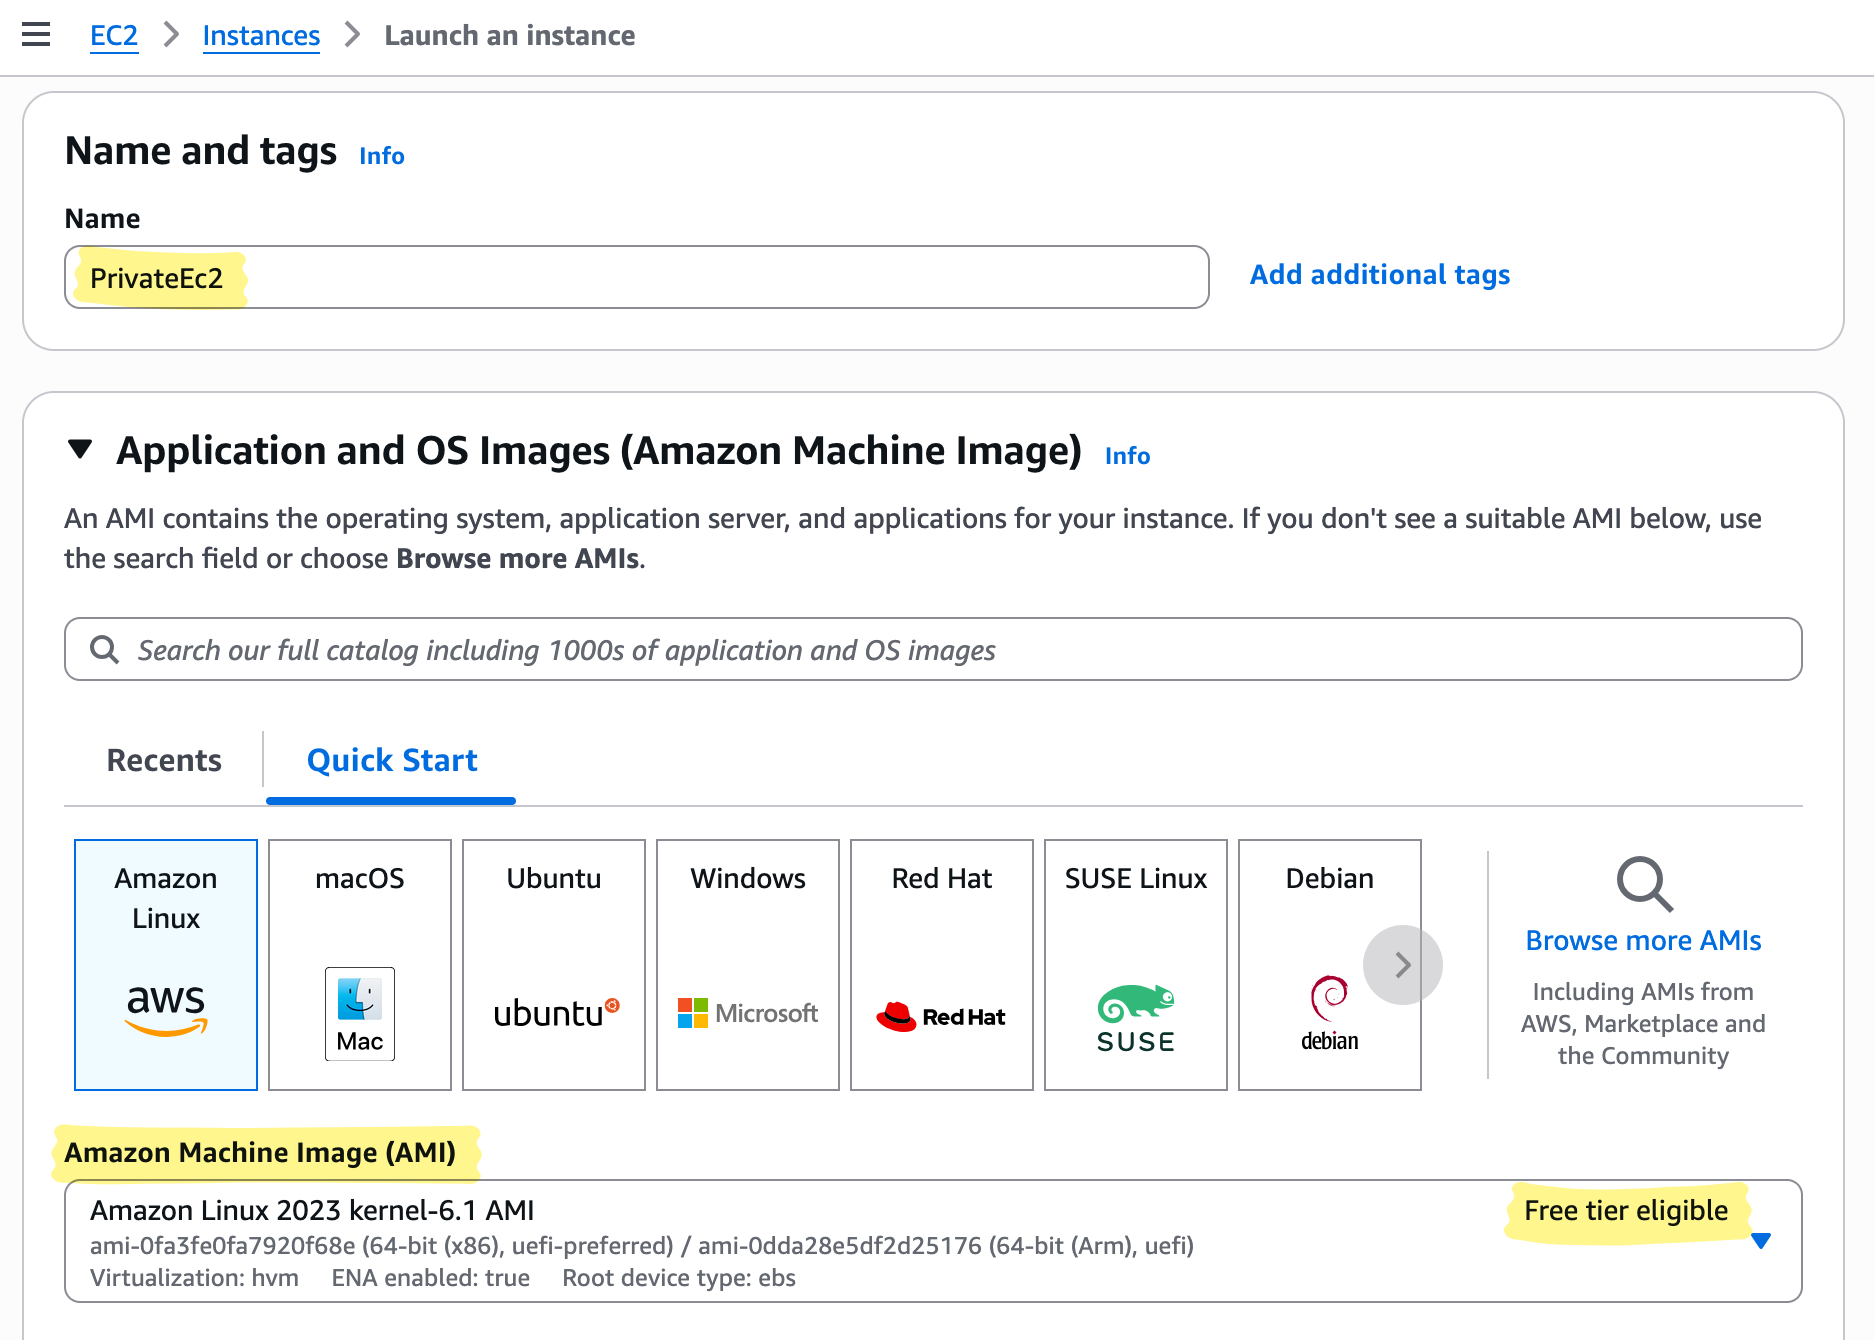
5b. Private EC2
Steps:
- Launch t3.micro (free-tier)
- Set
- Name: PrivateEc2
- Key pair: Create/download Private-Ec2-keypair.pem
- VPC: LabVPC, Subnet: PrivateSubnet, Auto-assign Public IP: Disable
- Security group: Allow SSH (22) only from PublicEc2 security group
- Click Launch


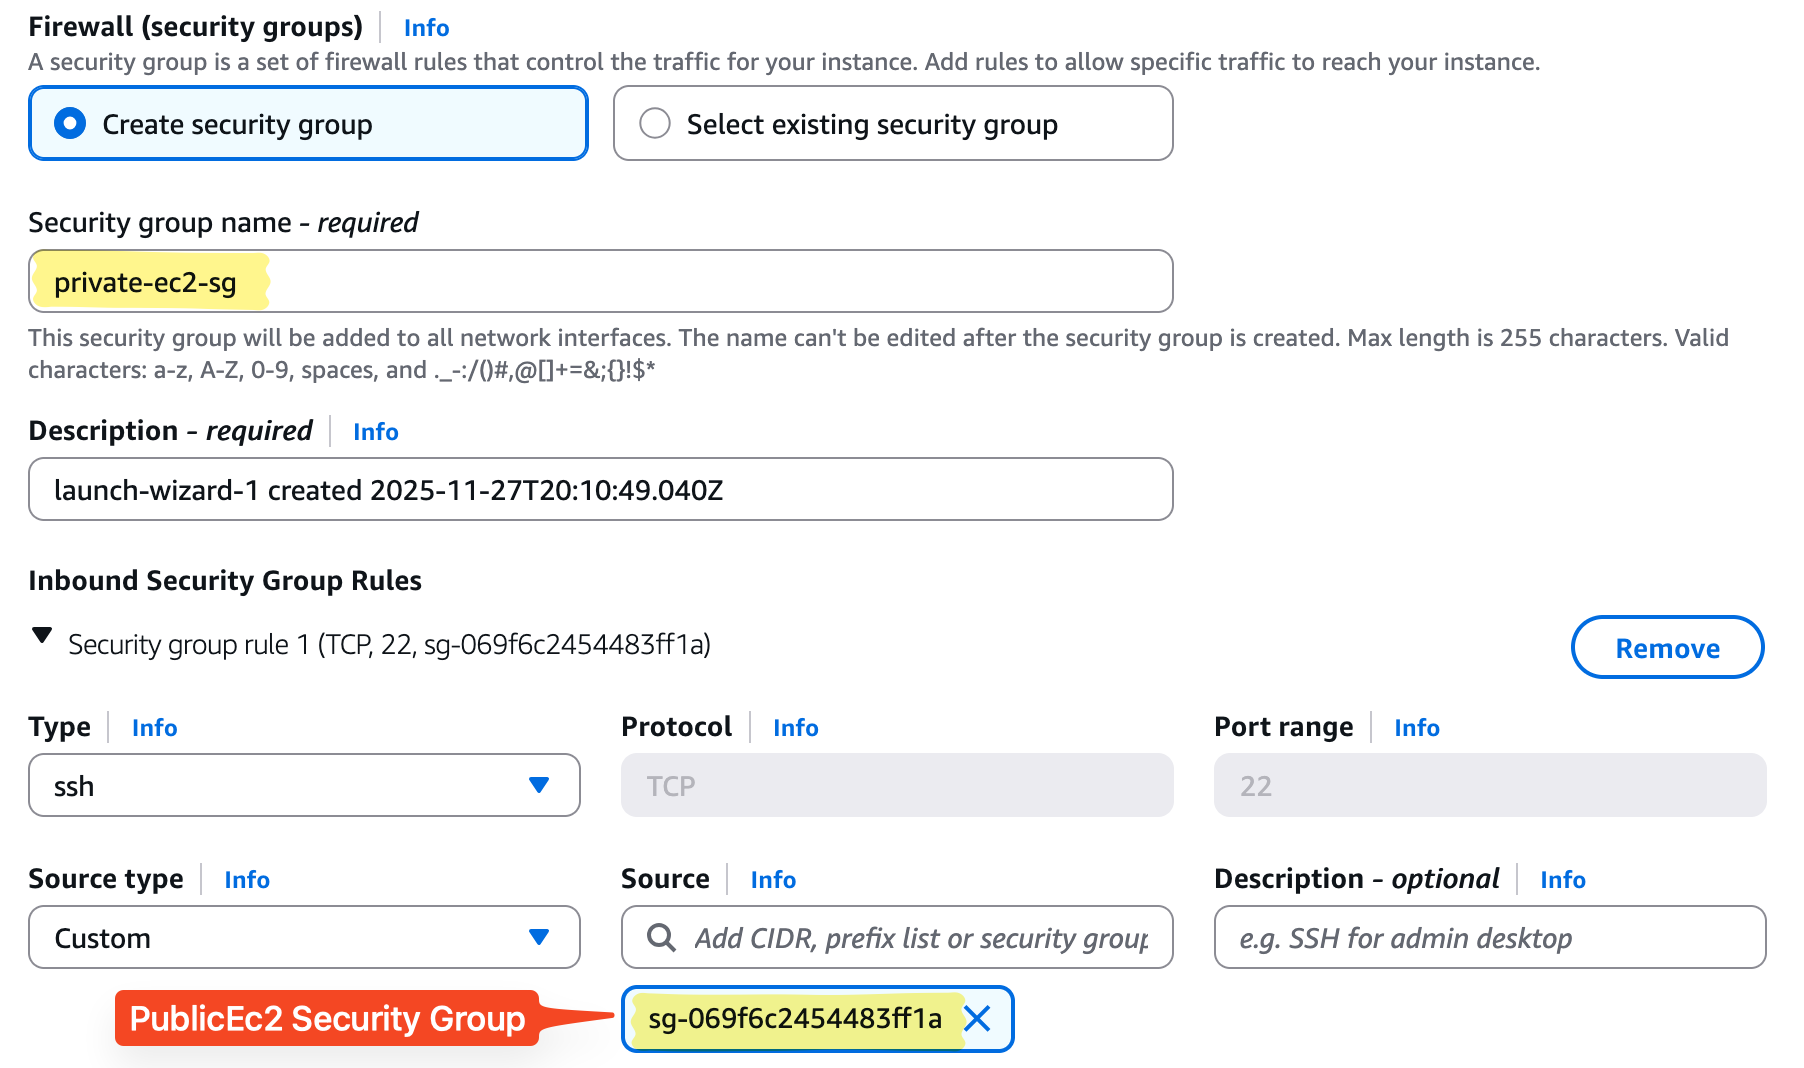
Pro Insight: Private EC2 has no direct Internet access. All outbound traffic will pass through the NAT instance. SSH access is restricted to the public EC2 for controlled administration.
Auto-assigning a public IP determines whether an EC2 instance can be reached directly from the Internet. For public instances, like a web server or bastion host, this option is enabled so the instance receives a public IP automatically. This allows direct access for SSH or HTTP traffic without needing to manually attach an Elastic IP.
In contrast, private instances, such as databases or internal servers, have auto-assign public IP disabled to keep them isolated from the Internet. These instances communicate externally only through a NAT instance or NAT Gateway, which allows controlled Internet access while keeping the instance’s private IP hidden.
Configure NAT on Public EC2
A NAT (Network Address Translation) instance allows private instances to access the Internet without exposing their private IPs. Next we will:
Disable Source/Destination Check on PublicEc2. By default, an EC2 instance is only allowed to send and receive traffic for itself — AWS blocks any packets not sourced from or destined to that instance. Disabling Source/Dest Check allows the instance to forward traffic on behalf of private hosts, which is required for it to function as a NAT instance.
Steps to disable:
- Go to EC2 → Instances
- Select PublicEc2
- Click Actions → Networking → Change source/dest check
- Select Stop and save

Enable IP forwarding and configure NAT using nftables. Enabling IP forwarding and configuring nftables turns the instance into a functional router that can translate private IP addresses for outbound Internet access.
Steps:
# Fix key permissions
chmod 400 Public-Ec2-keypair.pem

# SSH into public EC2 and
ssh -i Public-Ec2-keypair.pem ec2-user@44.203.210.91

# Install nftables
sudo dnf install -y nftables

# Enable IPv4 forwarding
sudo sysctl -w net.ipv4.ip_forward=1
echo "net.ipv4.ip_forward=1" | sudo tee -a /etc/sysctl.conf

# Configure NAT
sudo nft add table ip nat
sudo nft 'add chain ip nat POSTROUTING { type nat hook postrouting priority 100 ; }'
sudo nft add rule ip nat POSTROUTING oif ens5 masquerade

# Save rules
sudo sh -c 'nft list ruleset > /etc/nftables.conf'

# Enable service
sudo systemctl enable nftables
Add Private Subnet Route to NAT
Private subnet needs a default route to the NAT instance. This tells private EC2s where to send traffic destined for the Internet.
Steps:
- Go to VPC → Route Tables → PrivateRT → Edit routes
- Add route: 0.0.0.0/0 → NAT instance ID

Pro Insight: Private EC2 can now access the Internet securely through the NAT instance.
Testing Internet Connectivity
“I’ve summarized both scenarios in the tables below — now it’s time for some hands-on testing… yayyy! 🎉 Let’s see our public and private instances in action.”
- Public EC2:
We can log into the public instance using the assigned key pair. Once logged in, we can verify internet connectivity:
ssh -i Public-Ec2-keypair.pem ec2-user@44.203.210.91
ping 8.8.8.8
curl http://checkip.amazonaws.com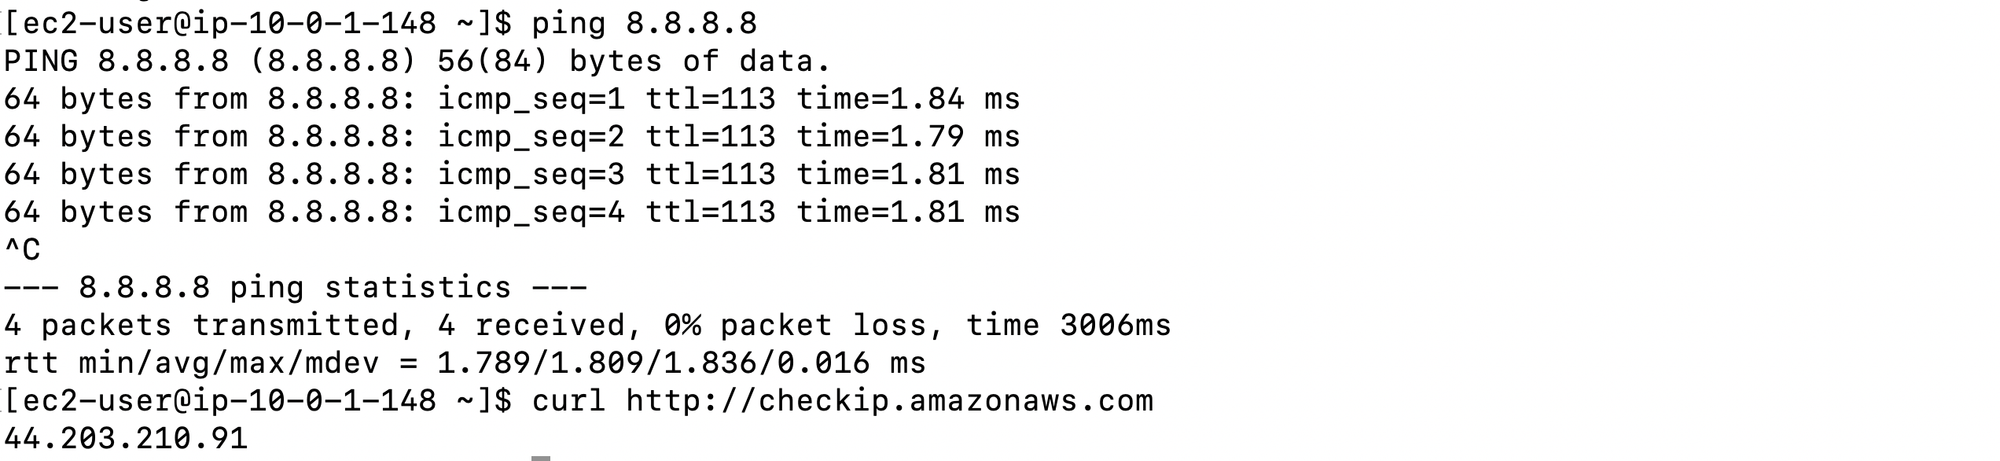
A successful response from ping and curl confirms that the instance has proper internet connectivity.
- Private Ec2:
We can log into the private instance via the public instance using key forwarding. This allows access while keeping the private key secure. After login, internet connectivity can be tested:
eval "$(ssh-agent -s)"
ssh-add Private-Ec2-keypair.pem
ssh -A -i Public-Ec2-keypair.pem ec2-user@44.203.210.91
ssh ec2-user@10.0.2.64
ping 8.8.8.8
curl http://checkip.amazonaws.com
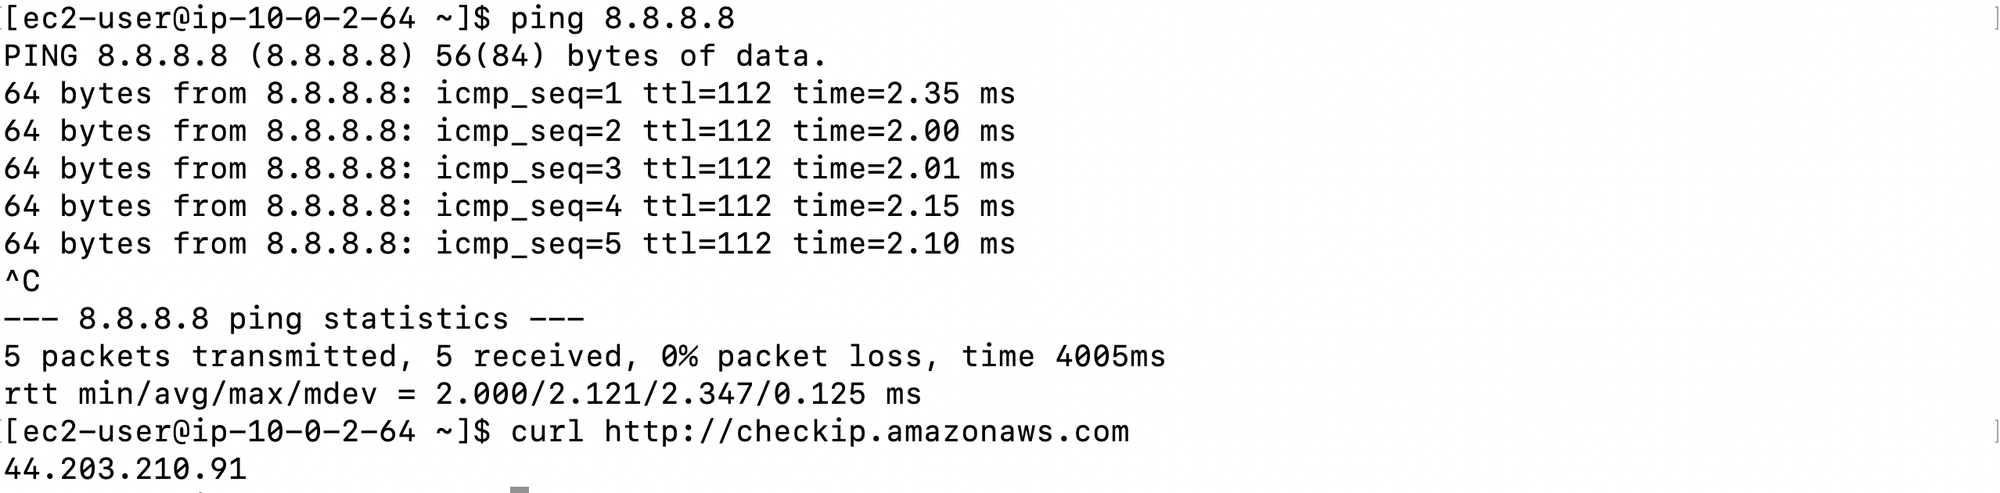
A successful ping and curl indicates that the private instance can reach the internet through the NAT instance.
Pro Insight: Public EC2 accesses the Internet directly. Private EC2 accesses the Internet via NAT with its private IP hidden.
Summary & Key Takeaways
In this lab, you’ve successfully built a VPC with public and private subnets, configured route tables and security groups, and launched EC2 instances in each subnet. The public EC2 provides direct Internet access, while the private EC2 reaches the Internet securely through a NAT instance, keeping its private IP hidden. SSH access to private instances is safely handled via the public EC2 acting as a bastion host.
Optionally, attaching an Elastic IP to the NAT instance ensures a stable, consistent public IP for outbound traffic. By cleaning up EC2 instances, NAT configuration, subnets, route tables, and IGWs afterward, you avoid unexpected charges. This hands-on experience gives you a solid understanding of how AWS networking components—VPCs, subnets, IGWs, NAT, route tables, and security groups—interact in real-world setups.