Blog1 - Introduction to AWS Networking Basics
Introduction: Why AWS Networking Matters
When I first logged into the AWS console, I felt like I had entered a bustling city without a map. EC2 instances, VPCs, subnets, and gateways sounded like jargon, but over time I realized they are simply streets, intersections, and traffic lights for your data. If you understand the roads, the traffic flow, and the rules, you can move workloads across AWS efficiently and securely.
In this blog, I’ll take you through the foundational concepts of AWS networking — everything from global infrastructure, private and public services, and disaster recovery, to the core of VPCs, subnets, routing, NAT gateways, and security. Think of this as your roadmap before hitting the highway.
Setting Up Your AWS Account Safely
Before diving into VPCs, subnets, and NAT gateways, you’ll need an AWS account. Good news: AWS offers a Free Tier account, which gives you limited access to many services at no cost, making it perfect for hands-on labs and learning. If you haven’t created one yet, you can sign up here: AWS Signup Page.
Root vs IAM: Why it matters for labs and learning
When you first create an AWS account, AWS generates a root account — think of it as the ultimate key to your cloud city. The root account has unrestricted access: it can manage billing, security settings, and even close the account. Basically, it can do everything. But with great power comes great responsibility — using the root account for everyday labs or experiments is risky and can lead to mistakes that are hard to undo.
That’s where IAM (Identity and Access Management) users come in. IAM lets you create users with specific permissions, so each person or process only has access to what they need. For hands-on labs, always create an IAM user and assign administrator permissions if necessary. This approach keeps your root account safe, prevents accidental changes to critical account settings, and follows AWS best practices.
💡 Tip: Even just exploring the AWS console is safer with an IAM user than with root. Think of it as having a controlled set of keys to your city streets instead of one master key that opens every door.
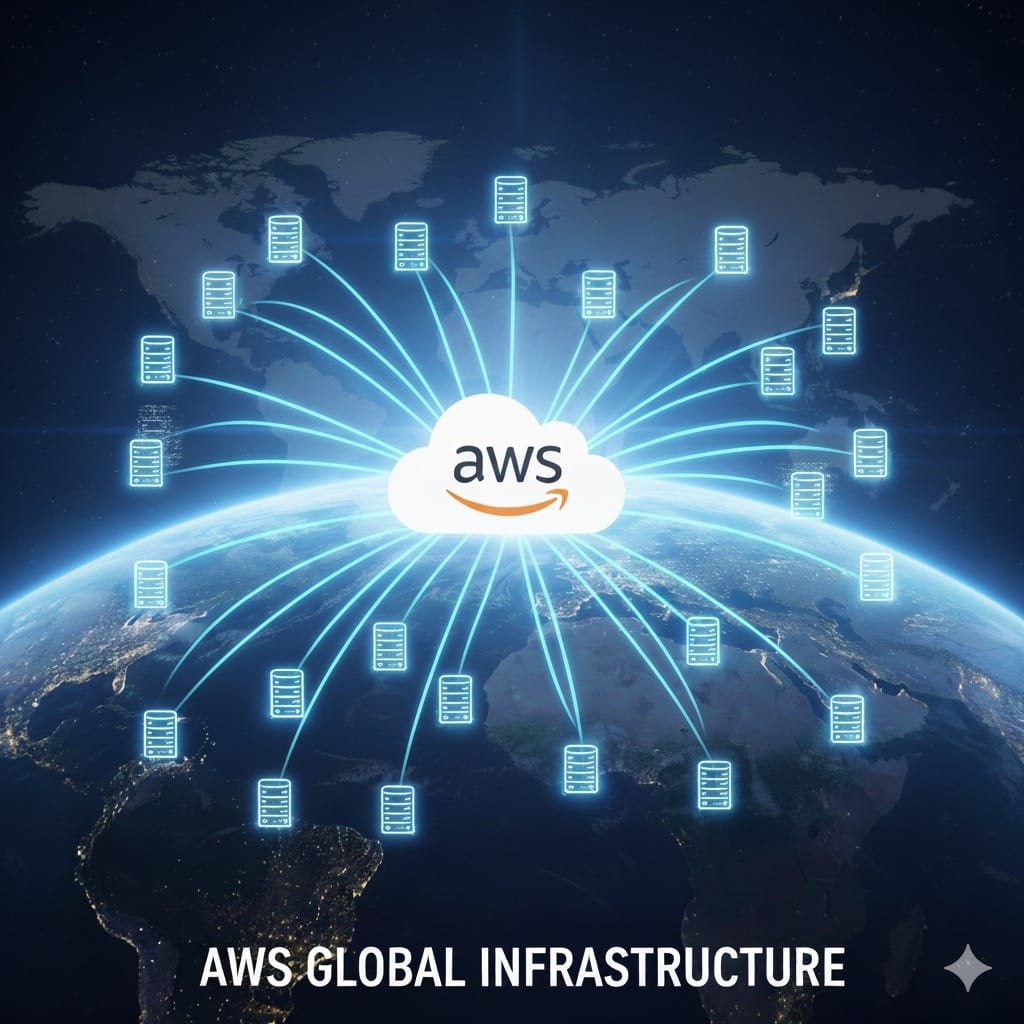
AWS Global Infrastructure
Before you start deploying resources in AWS, it really helps to understand Regions and Availability Zones (AZs). These are the foundational building blocks of AWS’s global network, and planning around them early ensures your applications are highly available, fault-tolerant, and secure.
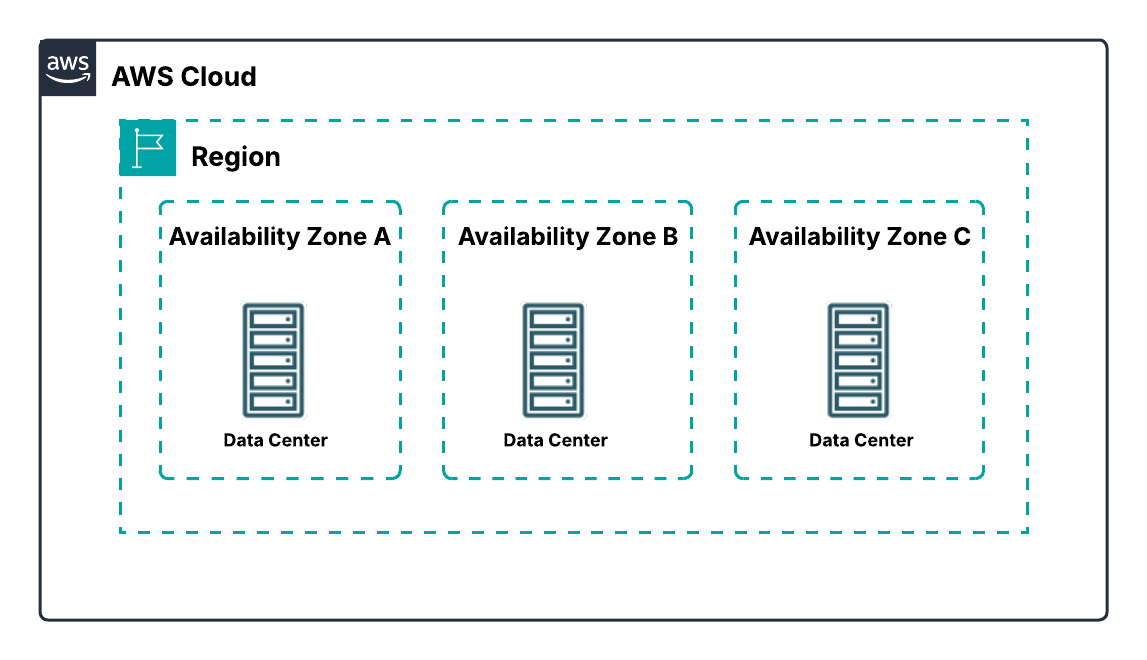
AWS Regions
A Region is a geographic area containing multiple data centers. Unlike some cloud providers that define a region as a single data center, each AWS Region includes at least three isolated and physically separate AZs. Regions are designed for high availability, fault tolerance, and strict security compliance.
From my experience, choosing the right Region is more than just picking a location. It affects latency for your users, service availability, pricing, and even regulatory compliance. I’ve learned that spending a little extra time evaluating Region location upfront can save headaches later. AWS has Regions all over the world — North America, South America, Europe, Asia Pacific, China, South Africa, and the Middle East — giving you flexibility to serve your users wherever they are.
AWS Availability Zones (AZs)
An Availability Zone (AZ) is one or more discrete data centers within a Region. Each AZ has independent power, cooling, and networking and is connected to other AZs via redundant, high-bandwidth, low-latency links. All traffic between AZs is encrypted, and the network is fast enough to support synchronous replication, which is critical for fault-tolerant applications.
AZs are physically separated by meaningful distances — usually many kilometers apart, but within 100 km of each other. This separation ensures that events like power outages, storms, or other local disruptions in one AZ don’t affect the others. In my early projects, I quickly realized that deploying resources across multiple AZs isn’t just a best practice for exams — it’s essential for keeping applications online during unexpected failures.
Why This Matters
Understanding Regions and AZs before creating VPCs, subnets, or NAT gateways is key to building resilient AWS architectures. Proper placement allows your applications to withstand failures, serve users efficiently across the globe, and meet security and compliance requirements. Multi-AZ deployments are truly the foundation for enterprise-grade, highly available AWS applications.
Private vs Public AWS Services
Before creating VPCs, it’s important to think about what your resources need to do and who needs to access them. This helps you decide whether a service should be public or private. When I first started, I used to just pick services randomly and ended up confused when some couldn’t communicate the way I expected. Over time, I realized it’s all about understanding the requirements.
If a resource needs to be accessed directly from the internet, it should be a public service. Examples include S3 buckets for files that users can download or API Gateway endpoints that expose APIs to the web. These services don’t need to live in a private subnet and can be reached directly over the internet. On the other hand, if a resource should remain internal, handle sensitive data, or only be accessed from within your VPC, it should be a private service. This includes things like RDS databases or EC2 instances running backend workloads without public IPs. Private services are isolated within your VPC, and if they need to reach the internet — for software updates or external API calls — the traffic must go through a NAT instance or gateway in a public subnet.
Thinking in terms of requirements and outcomes rather than just labels makes designing your network much easier. Instead of memorizing which services are public or private, focus on what each resource needs to do and how users or other services will interact with it. This approach ensures your AWS environment is both secure and functional from the start.
VPC Fundamentals
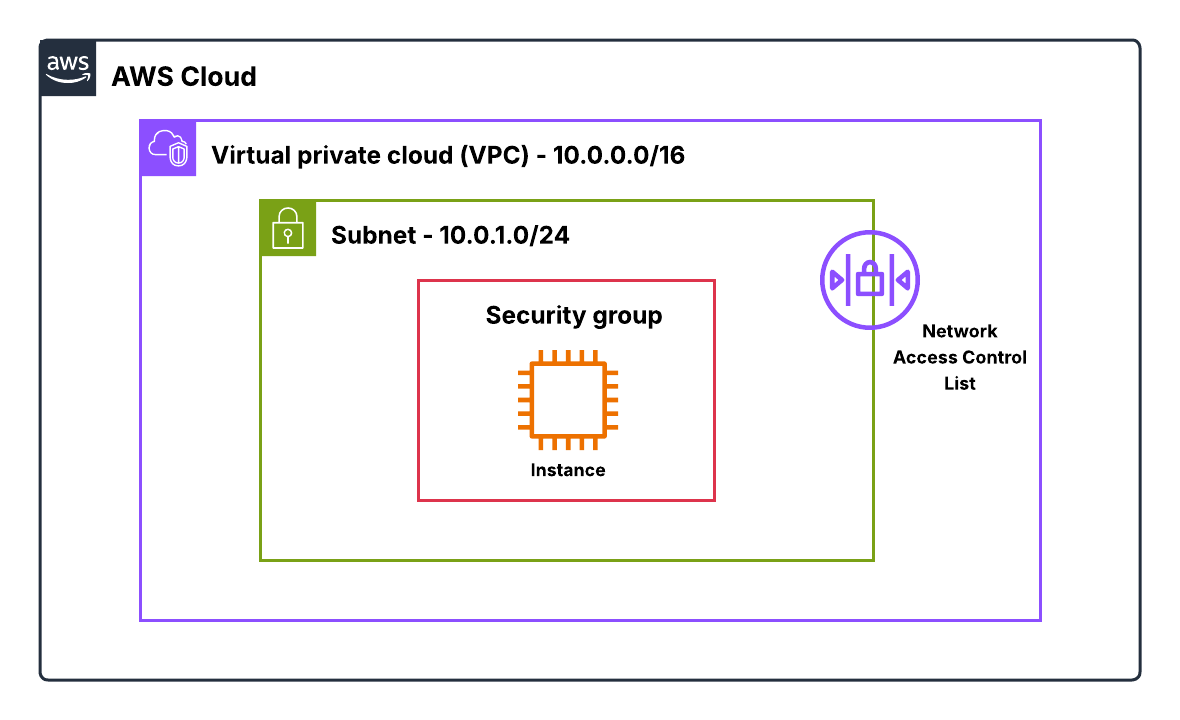
A VPC is essentially your private playground inside AWS. It’s an isolated network where you define the IP space, subnets, routing, and security.
When I first created my VPC, it felt like drawing the boundaries of a new city: where should the public roads be, where should the private alleys go, and how would traffic flow? Choosing the CIDR block for your VPC is like choosing how large your city should be. Too small, and you’ll run out of IPs; too large, and you may waste resources or increase routing complexity. AWS reserves a few IPs in every subnet, so it’s essential to plan carefully.
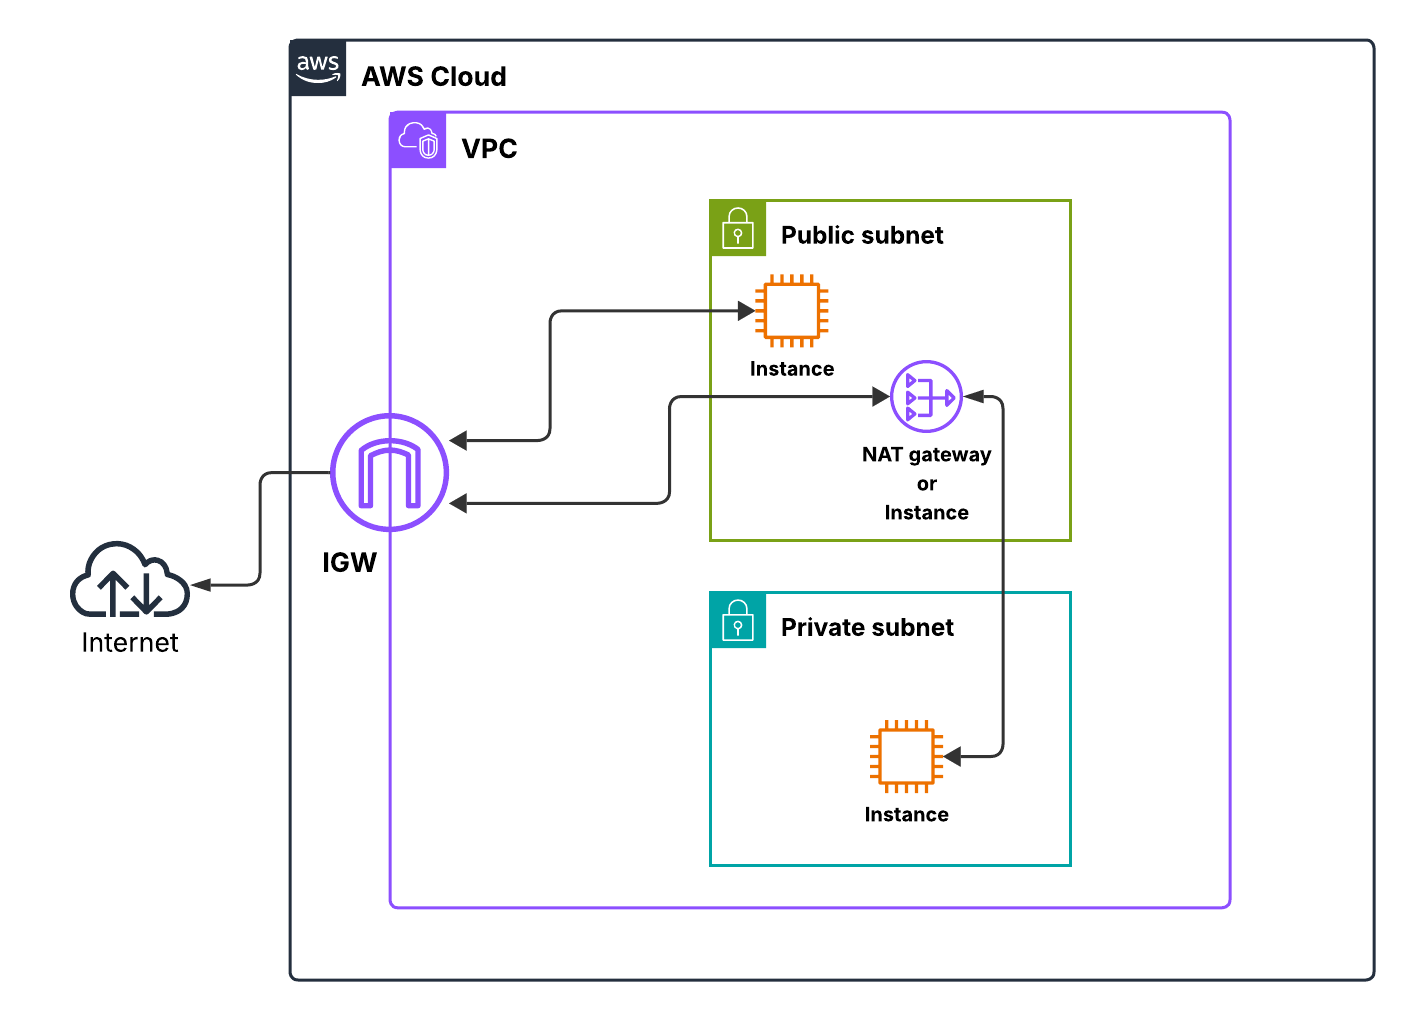
Subnets carve out your VPC into functional zones. Public subnets allow direct internet access via an Internet Gateway (IGW), perfect for load balancers or bastion hosts.
Private subnets, on the other hand, keep backend servers hidden from the internet and rely on NAT gateway or instance for outbound connections. I remember setting up a backend EC2 instance and trying to download updates without a NAT gateway — nothing worked. Once I added a NAT gateway in the public subnet, traffic flowed seamlessly.
Route tables control how traffic leaves a subnet. Every subnet must be associated with one, and the most specific route takes priority. Your private subnet routes outbound traffic through the NAT gateway or instance, while your public subnet uses the IGW. This combination of VPC, subnets, NAT, and IGW forms the foundation of secure, scalable AWS networking.
Security Groups (SGs)
Security Groups started making sense to me once I realized they’re basically the personal firewall wrapped around your resource. When you attach a security group to an EC2 instance or an ENI (Elastic Network Interface - explained in later sections), it immediately becomes the traffic filter for anything going in or out of that resource. What I like about SGs is how predictable they are. They’re stateful, which means if my instance sends something out, the response is automatically allowed back in — even if I never added an inbound rule for it. That stateful behavior takes so much mental load off when you're learning networking in AWS.
Every VPC comes with a default security group, but most of the time you’ll end up creating your own. Each SG has its own inbound and outbound rules, where you define the source/destination, protocol, and port range. And the cool part? You can assign multiple SGs to a single instance, or even share SGs across VPCs in the same Region using VPC-level association.
The important thing is this:
A security group only allows what you explicitly permit. There’s no “deny” button. If the rule isn’t there, the traffic simply doesn’t get through.
SGs also have some built-in exceptions. They won’t filter internal AWS traffic like DNS, DHCP, IMDS, or the VPC router's reserved IPs — and that’s normal. Behind the scenes, AWS wants these core services to keep running smoothly.
Over the years, I’ve picked up a few habits that save headaches:
– Keep SGs simple. Group similar resources under the same SG
– Restrict SSH and RDP to trusted IP ranges — never open them to 0.0.0.0/0
– Avoid huge port ranges. Only open what’s needed
– And if you want an extra layer of protection, pair SGs with similar NACL rules
At the end of the day, SGs give you tight, instance-level control without overwhelming you. They’re clean, they’re forgiving, and they’re usually the first thing I check when something “isn’t connecting.”
Network ACLs (NACLs)
NACLs took me a bit longer to appreciate because they behave so differently from SGs. Instead of sitting on the instance, they sit at the subnet boundary. Think of them as the perimeter fence for anything inside that subnet.
A NACL controls what traffic is allowed to enter or leave a subnet. And unlike SGs, NACLs are completely stateless. That means every packet is evaluated on its own.
If you create an inbound rule allowing traffic in, you must also create the matching outbound rule for the return traffic — or the connection simply dies. That stateless behavior is powerful, but it’s also where people get tripped up.
Every subnet must be associated with a NACL. If you don’t create your own, AWS gives you a default NACL that allows everything. You can replace it with a custom NACL anytime, but remember:
One subnet → One NACL. A NACL can map to multiple subnets, but not vice-versa.
Each NACL has a numbered list of inbound and outbound rules that can allow or deny traffic. AWS evaluates the rules in order — lowest number wins. As soon as a packet matches a rule, evaluation stops. This is why numbering your rules in increments (10, 20, 30…) is a lifesaver when you need to insert something later.
Just like SGs, NACLs also don’t filter certain AWS-internal traffic such as DNS, DHCP, IMDS, or Time Sync. They simply let those through.
Where NACLs shine is when you want subnet-level filtering or to block something outright — like a sketchy IP or a protocol you don’t want anywhere near your workloads. They add that extra layer of security around your subnets, especially when paired with well-designed SGs.
Elastic Network Interfaces (ENIs)
I didn’t fully “get” ENIs until I started thinking of them as the actual network cards of my EC2 instances — except these ones are virtual and detachable. Once that clicked, ENIs became one of those quiet-but-powerful building blocks in AWS networking.
An ENI lives inside a subnet and carries all the networking identity of an instance: its private IPs, public IP (if it has one), MAC address, and the security groups attached to it. What surprised me early on was that these attributes don’t belong to the instance — they belong to the ENI itself.
If you detach that ENI and attach it to a different instance in the same AZ, all of that network identity moves with it. Traffic that used to reach the old instance now flows to the new one, instantly.
That’s why ENIs feel so flexible. Need multiple IPs? Add them to the ENI. Need to isolate traffic? Attach different ENIs to different interfaces on the same box. Even routing-style use cases like NAT or firewalls require tweaking source/destination checks on the ENI — something you can only do at this level.
And of course, every instance starts with a primary ENI that you can’t detach. Everything else — secondary ENIs, extra IPs, Elastic IPs — hangs off this core networking object. Some AWS services even create their own managed ENIs for things like load balancers or container tasks. You don’t touch those, but they remind you just how foundational ENIs really are.
NAT Gateways vs NAT Instances: Making Private Subnets Talk to the Internet
When I first started working with private subnets in AWS, I quickly ran into the problem: instances inside a private subnet can’t just reach the internet on their own. That’s where NAT (Network Address Translation) comes in. Essentially, NAT lets your private instances initiate outbound connections without letting the internet initiate connections to them. But AWS gives you two ways to do this: NAT Gateways and NAT Instances.
NAT Gateways
Think of a NAT Gateway as a safe exit door for your private servers. It sits in a public subnet with a public IP, but your private instances never touch the internet directly. All outbound traffic starts from inside the VPC, passes through the NAT Gateway, and returns automatically with no public exposure.
What I like most about NAT Gateways is how little you have to think about them. AWS takes care of availability, scaling, and maintenance, so once it’s set up, it just works. For most setups today, this is the simplest and safest way to give private subnets internet access.
NAT Instances
NAT Instances are basically EC2 instances preconfigured for NAT. They do the same job—letting private resources talk to the outside world—but require more babysitting. You need to launch the instance in a public subnet, assign a public IP or Elastic IP, manage security groups, and monitor instance performance. Scaling, patching, and high availability are all on you.
I’ve found NAT Instances useful only in niche cases, like when you need custom firewall rules or want to control the NAT behavior manually. Otherwise, they feel like reinventing the wheel compared to the simplicity of NAT Gateways.
The Key Takeaways
- Performance & Reliability: NAT Gateways beat NAT Instances every time with higher bandwidth and built-in redundancy.
- Maintenance: NAT Gateways are managed by AWS; NAT Instances are on you.
- Use Cases: NAT Instances are mostly for legacy setups or highly customized NAT requirements. For modern setups, go with NAT Gateways.
In short, NAT Gateways are my go-to for almost every VPC setup. NAT Instances are the “manual option,” handy if you really need full control, but otherwise, they’re more work than they’re worth.
Putting It All Together: Core VPC Architecture
Now comes the fun part — visualizing all the components in a single multi-AZ VPC setup. The first time I sketched this out, it helped me understand how routing, NAT gateways, and security come together. Imagine two AZs, each with a public and private subnet.
Public subnets host your internet-facing resources like NAT Gateways, ALBs, or bastion hosts. Private subnets hold your backend workloads such as EC2 application servers, RDS databases, or ECS tasks. Traffic from private subnets routes through the NAT gateway to access the internet, while the IGW serves public subnets directly. SGs protect individual instances, and NACLs guard the subnet edges.
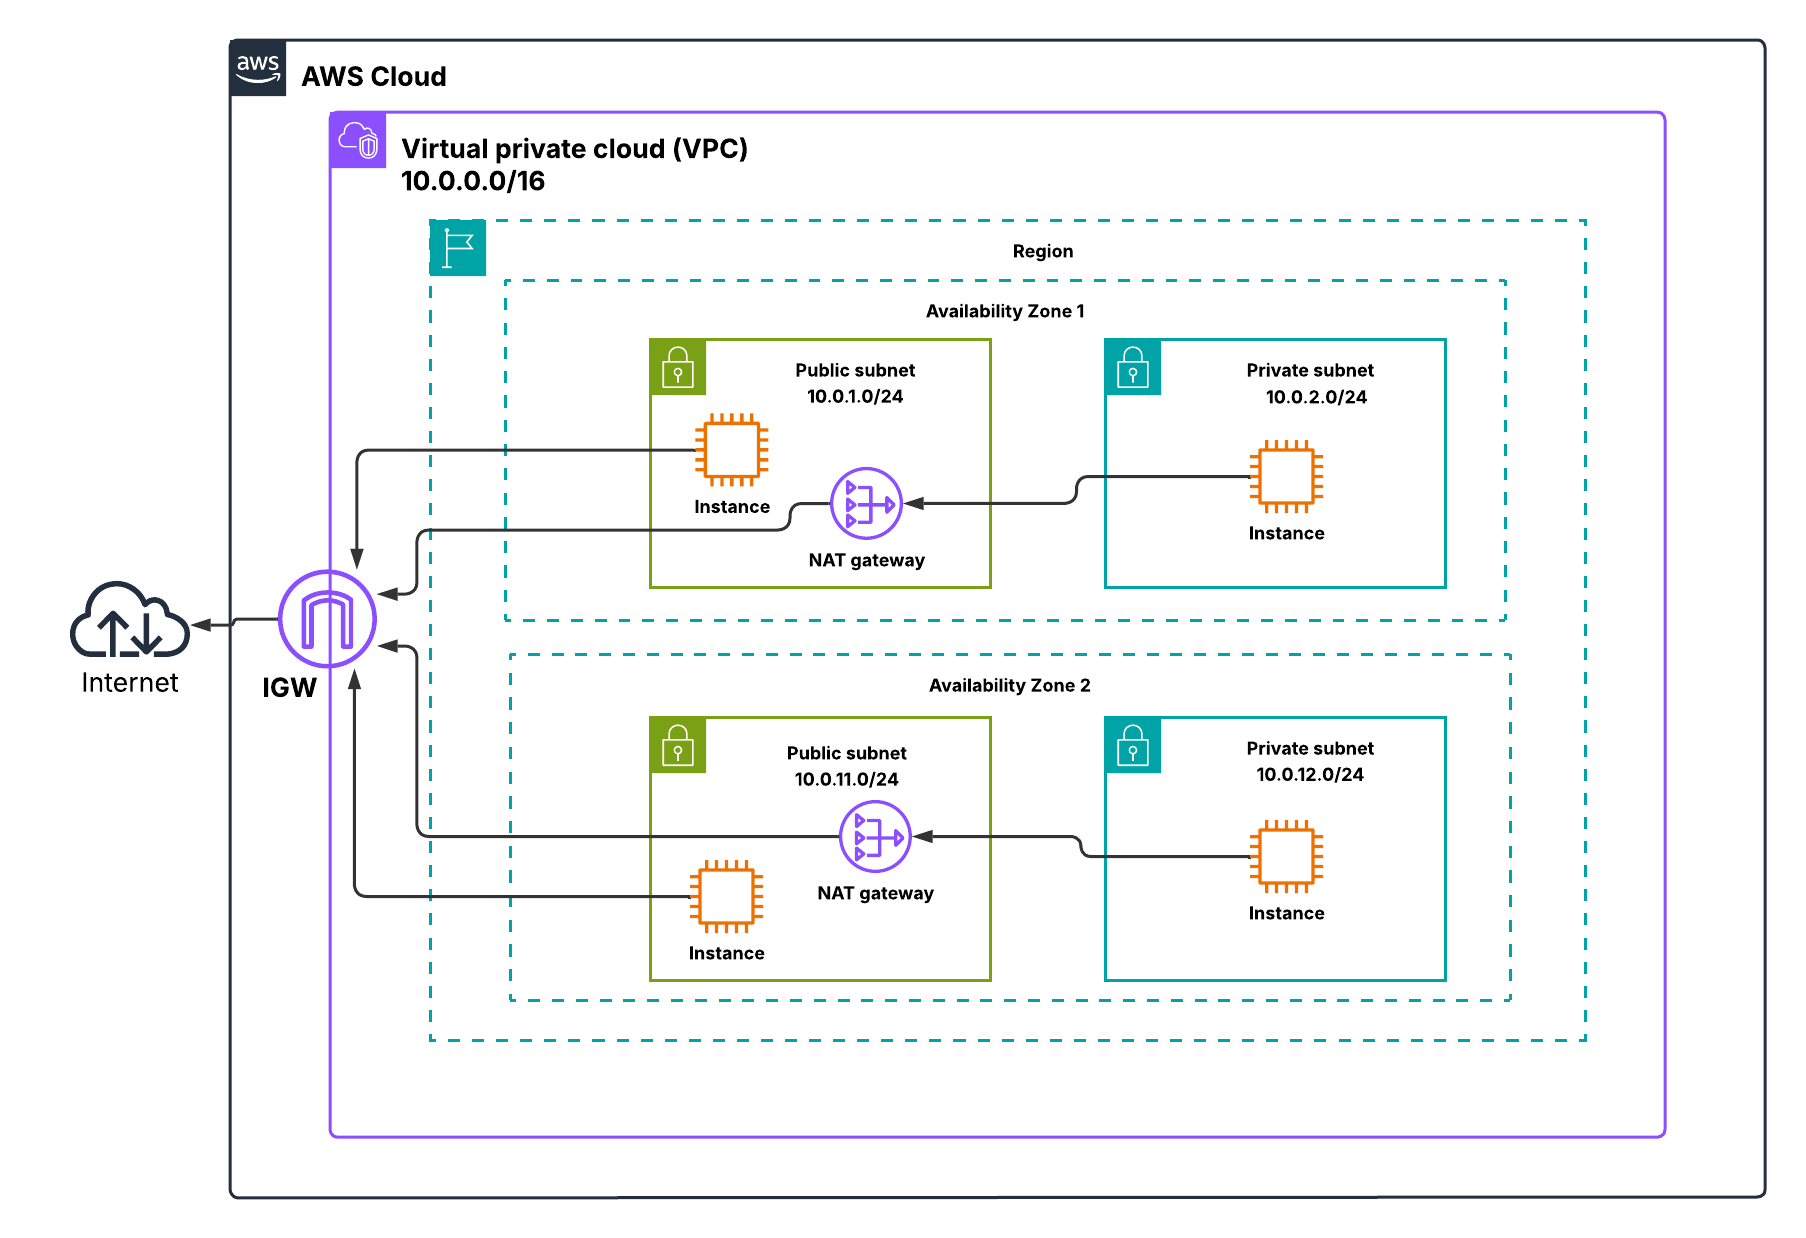
This layout ensures high availability, controlled internet access, and layered security. Once I drew this diagram, everything clicked: CIDR planning, route tables, NAT gateway, SGs, and NACLs all have a purpose and a place.
Quick Recap
Let’s do a quick recap:
- Public subnets use IGW; private subnets use NAT gateways.
- SGs are stateful and control instance traffic. NACLs are stateless and control subnet traffic.
- Route tables define how traffic leaves subnets — the most specific route always takes precedence.
- ENIs give flexibility for failover and multi-homed instances.
- Multi-AZ deployments are essential for high availability.
In real projects, these principles directly affect cost, security, and maintainability. Properly placing your NAT gateways, planning CIDRs, and setting up SGs and NACLs ensures workloads remain reachable, secure, and resilient.
In the upcoming blogs, we’ll build hands-on VPC labs, covering public and private subnets, IGWs, route tables, SGs, and ENIs. I’ll start with a NAT Instance lab (free) — perfect for experimenting without cost and reinforcing core networking concepts behind NAT. Once that foundation is in place, we’ll move on to a NAT Gateway lab (may incur charges), which follows AWS’s recommended approach for real-world architectures.
👉 Next up: Blog 2: AWS Public & Private Subnets with NAT Instance