Blog 3 – AWS Public & Private Subnets with NAT Gateway (Hands-On Lab)
In Blog 1, we focused on the fundamentals — what a VPC is, how subnets and route tables work, and how traffic moves inside AWS. The goal was to understand the building blocks rather than make design choices.
In Blog 2, we applied those concepts by building a VPC with public and private subnets and using a NAT instance to provide outbound Internet access for private EC2 instances. We disabled source/destination checks, enabled IP forwarding, configured routing, and verified traffic flow. From a networking perspective, the design was valid.
And it worked.
But while testing the setup, an important distinction became clear: there is a difference between something that works and something that is easy to operate. A NAT instance introduces ongoing responsibility. It must remain available, be patched, and continue forwarding traffic correctly after reboots or configuration changes. None of this breaks the design, but it does increase operational overhead.
That naturally leads us to NAT Gateway.
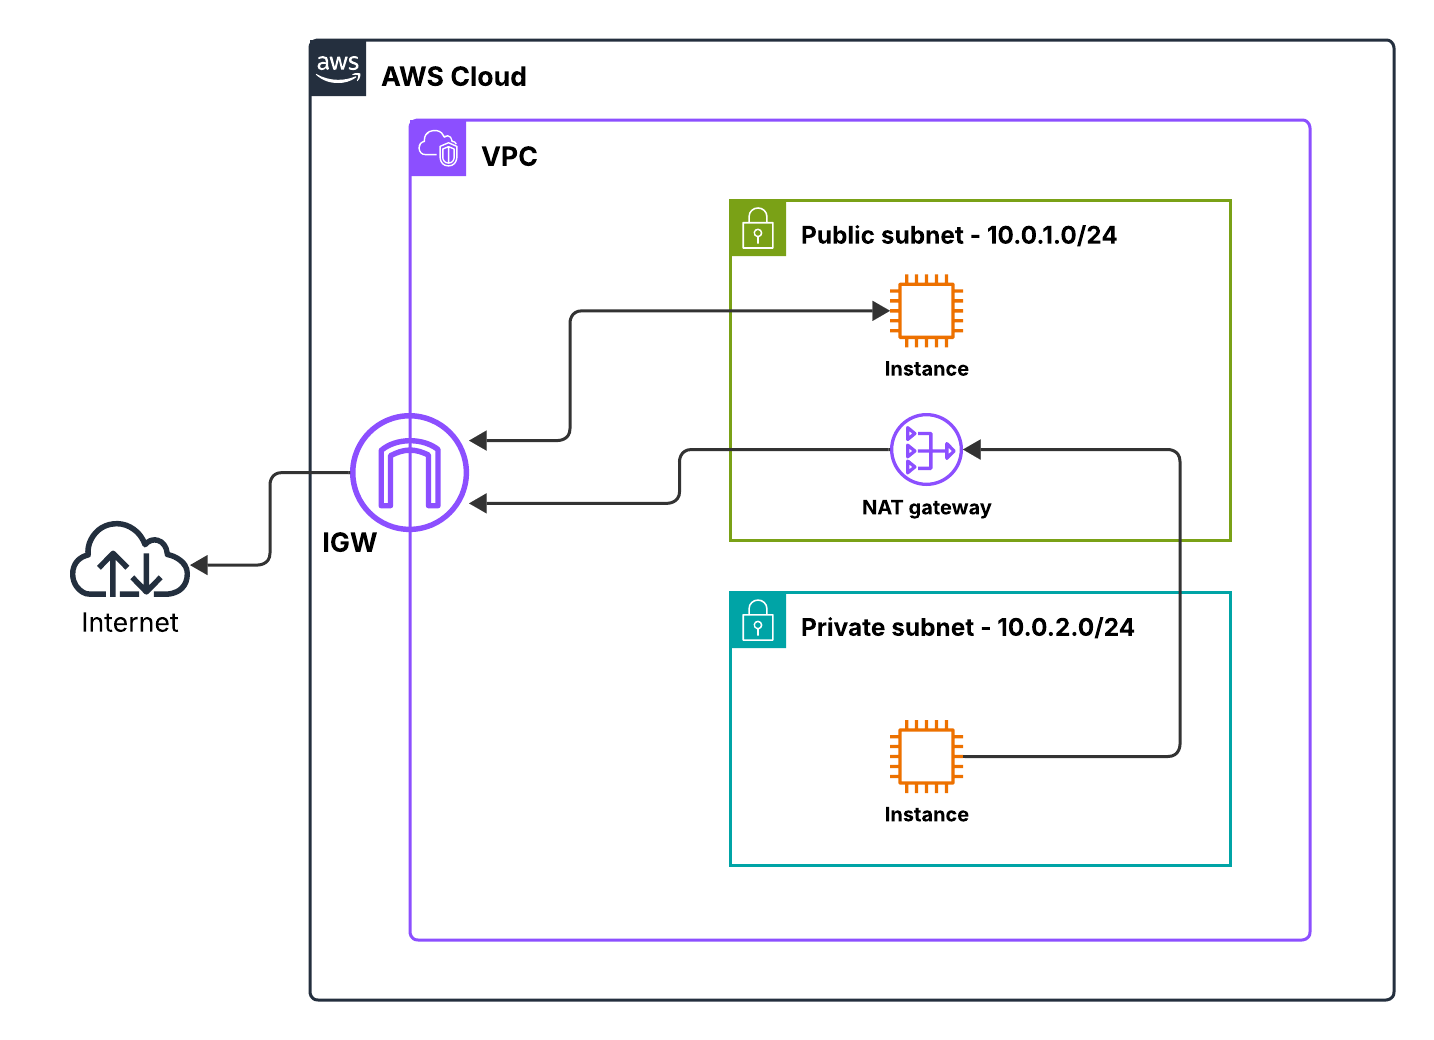
In this blog, we build a nearly identical architecture to Blog 2:
- One EC2 instance in a public subnet
- One EC2 instance in a private subnet
The only difference is how outbound traffic from the private subnet reaches the Internet. Instead of managing a NAT instance, we use a managed NAT Gateway. The routing model remains unchanged, but the operational burden is removed. Availability, scaling, and maintenance are handled by AWS.
If Blog 2 was about understanding how NAT works in AWS, this blog is about understanding why AWS provides NAT Gateway and how to use it effectively in a real-world environment.
Lab Goal
Before making any configuration changes, the expected behaviour of the environment should be defined. The purpose of this lab is not exploration, but validation of a specific traffic model.
| Instance | Subnet | Internet Access | Method |
|---|---|---|---|
| Public EC2 | Public subnet | Yes | Internet Gateway |
| Private EC2 | Private subnet | Outbound only | NAT Gateway |
The public instance is expected to initiate and receive Internet traffic directly via the Internet Gateway.
The private instance is expected to initiate outbound Internet connections while remaining unreachable from the Internet. No inbound connectivity from external networks is required or permitted.
Any behaviour outside of this model indicates a routing or security misconfiguration.
💡 Why this matters
When the desired traffic flow is defined upfront, the surrounding configuration becomes deterministic. Route tables, gateways, and security groups exist to enforce this behaviour rather than to be adjusted until connectivity appears.
AWS networking stops feeling unpredictable once traffic intent is fixed and every component can be evaluated against it.
Preparation
This lab requires an AWS account with sufficient IAM permissions to create and modify networking resources. Administrative-level access is recommended.
For this lab, I created all resources in a single AWS Region for simplicity and consistency, using us-east-1. The same steps can be followed in any other Region.
Step 1 – Create a VPC
Before we talk about subnets, gateways, or routing, we need to answer a fundamental question:
What is the boundary of the network we’re building?
In AWS, that boundary is the Virtual Private Cloud (VPC). A VPC is not just a container you click through in the console — it is the logical edge of your network. Every subnet, route table, Internet Gateway, NAT Gateway, and EC2 instance we create later will exist inside this boundary. Nothing routes into or out of it unless we explicitly allow it.
Think of the VPC as defining a new data center address space before racking a single switch.
Choosing the CIDR Range (Why /16 Matters)
For this lab, we define the VPC with the IPv4 CIDR block:
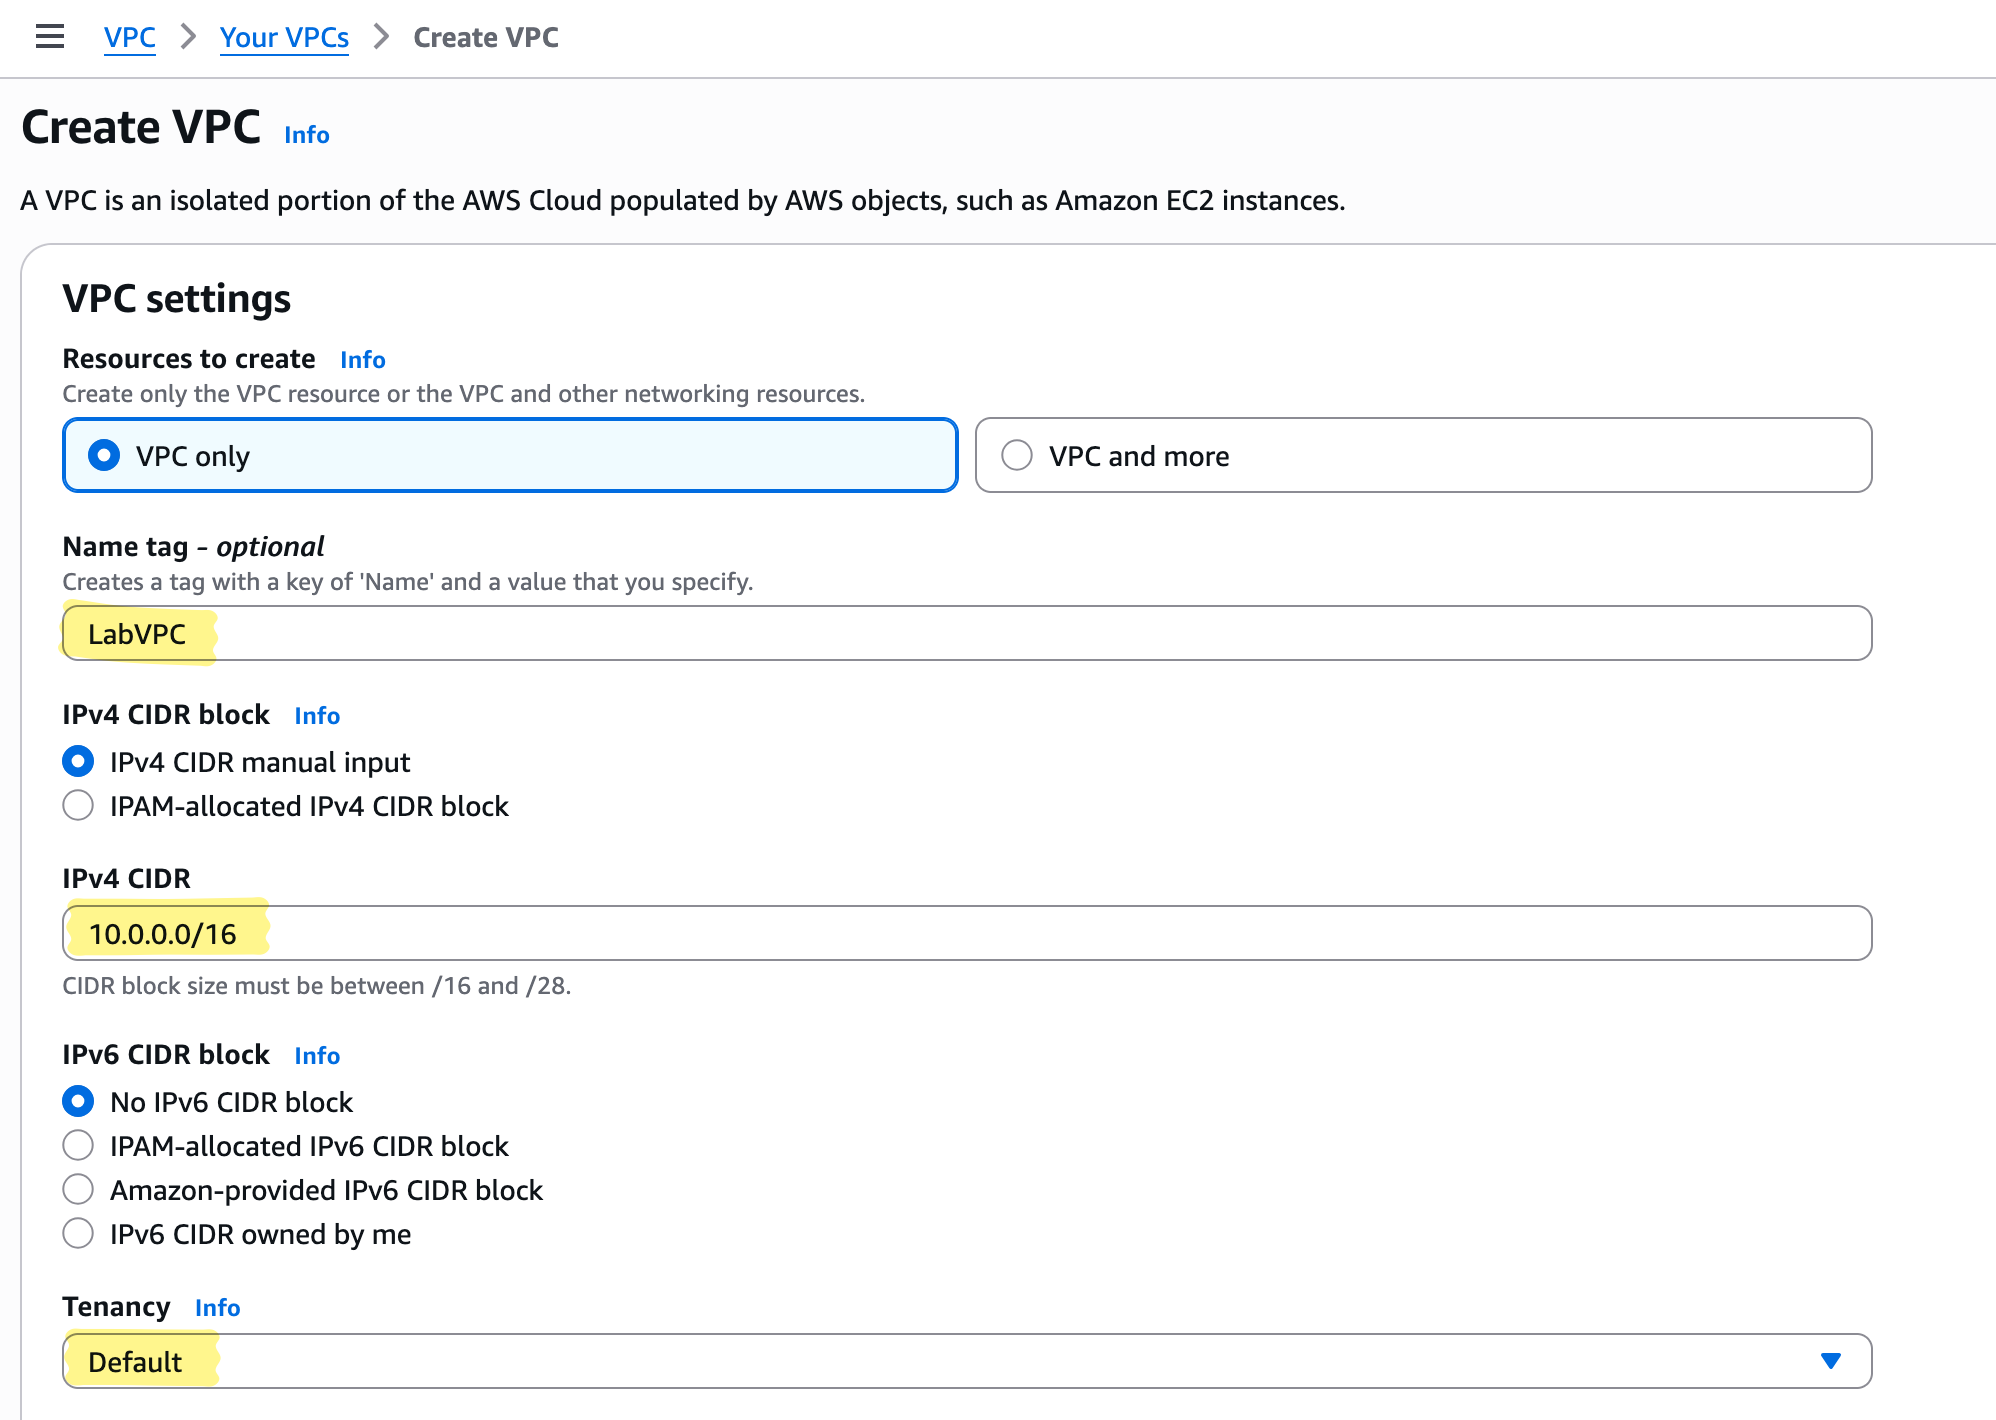
10.0.0.0/16
This choice is intentional. A /16 provides 65,536 IP addresses, which gives us plenty of room to carve out multiple subnets without worrying about exhaustion. More importantly, it keeps subnetting simple and predictable while learning.
With a /16, you can comfortably:
- Create multiple public and private subnets
- Spread subnets across Availability Zones
- Resize or add subnets later without renumbering everything
In real environments, CIDR sizing is often constrained by overlapping networks or corporate IP plans. In a learning or lab context, however, the goal is clarity — not optimization.
💡 Why this matters: Running out of IP space forces painful redesigns. Starting with a reasonably large CIDR avoids that distraction and lets you focus on how traffic flows, not on counting addresses.
Tenancy Choice (Keeping the Focus on Networking)
Tenancy is set to Default. Dedicated tenancy exists for compliance or licensing reasons, but it does not affect routing, subnets, or gateways. Using Default tenancy avoids unnecessary cost and complexity and keeps the lab focused on networking concepts rather than infrastructure isolation.
Navigating the AWS Console (How to Actually Create the VPC)
- Log in to the AWS Management Console.
- Navigate to VPC section
- Click “Create VPC”.
- Enter the VPC name (e.g.,
LabVPC) - Enter the IPv4 CIDR block (
10.0.0.0/16) - Set Tenancy to
Default
- Click Create. AWS provisions your VPC.
💡 Tip: Don’t worry about extra options like IPv6 or tags at this stage — focus on defining a clean, predictable network space. We’ll cover additional configurations later if needed.
What We’re Really Doing Here
The console clicks are secondary — the intent matters more:
- Define a predictable, sufficiently large network boundary
- Support both public and private subnets
- Cleanly separate internal routing from internet-facing connectivity
Everything that follows — route tables, Internet Gateways, NAT Gateways — depends on this initial decision. A poorly chosen VPC CIDR or unclear boundary makes later steps harder to reason about.
Mental Model Check
At this point:
- Nothing is public
- Nothing has internet access
- No routing exists beyond the VPC itself
We’ve created space, not connectivity. Launching an EC2 instance now would place it in isolation, reachable only within the VPC. That’s exactly what we want at this stage.
Step 2 – Create Public and Private Subnets
Once we have our VPC, the next step is to define how the network is partitioned. Subnets aren’t just ranges of IP addresses — they are behavioral zones that indicate intent: which resources should be able to talk to the Internet, and which should remain isolated.
Public Subnet
A public subnet is where we place resources that require direct Internet access, such as:
- NAT Gateways
- Bastion hosts
- Load balancers
These are your network’s “doorways” to the outside world.
Why the configuration matters:
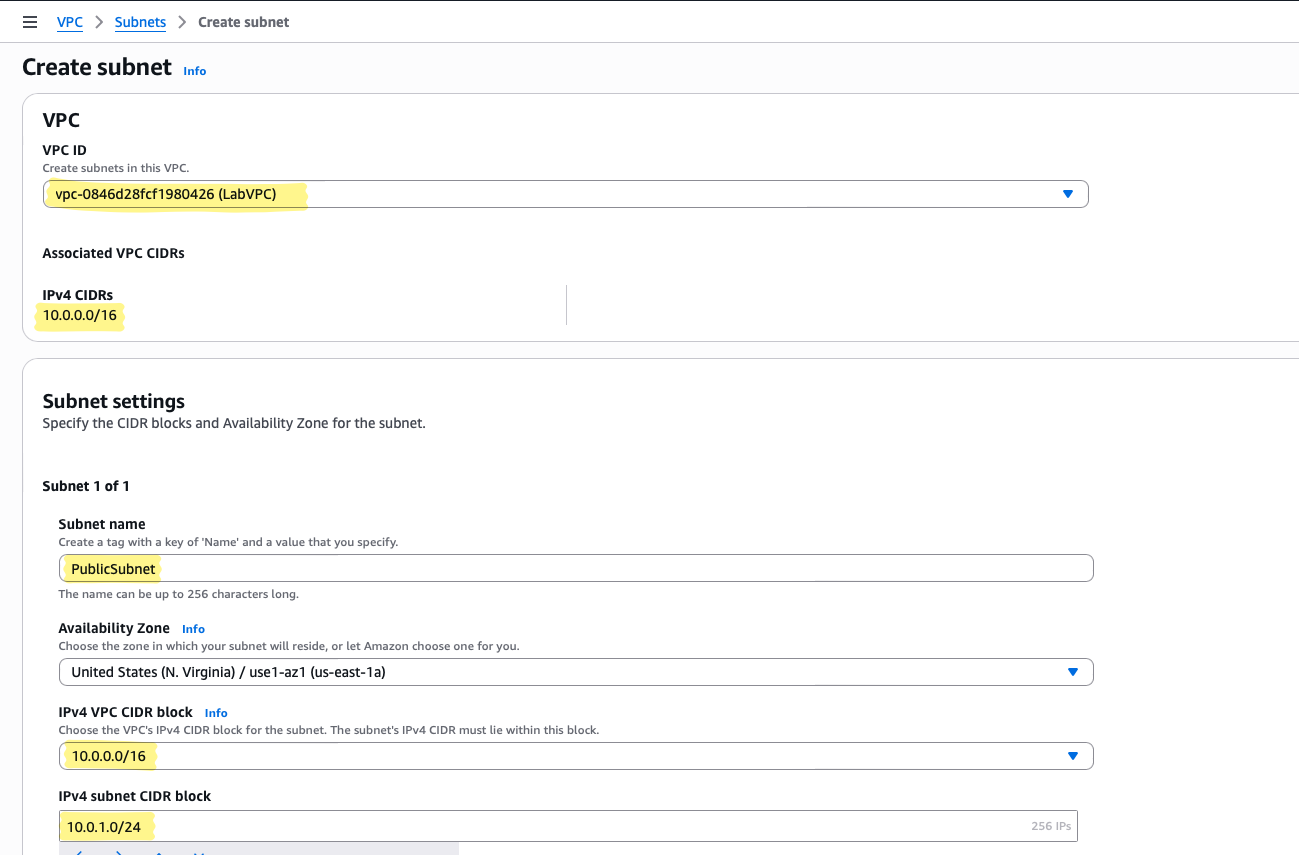
- VPC: The public subnet must belong to the VPC we just created (
LabVPC) - CIDR block:
10.0.1.0/24— a small slice of our /16 VPC, sufficient for front-facing resources - Availability Zone: Choose one that fits your architecture or lab setup
The public subnet’s route table will later direct Internet-bound traffic through the Internet Gateway (IGW). This ensures that resources in this subnet can reach and be reached by the Internet as needed.
💡 Tip: Assigning a /24 gives you 256 IP addresses — plenty for most lab purposes — while keeping things simple.
Console Navigation:
- Go to VPC → Subnets → Create Subnet
- Select the LabVPC we created
- Name it
PublicSubnet - Choose an Availability Zone
- Enter IPv4 CIDR block
10.0.1.0/24 - Click Create
At this stage, the subnet exists, but routing isn’t enabled yet. Resources here won’t reach the Internet until we attach them to an Internet Gateway and update the route table.
Private Subnet
A private subnet hosts resources that should not be directly reachable from the Internet, such as:
- Application servers
- Databases
- Internal services
Outbound Internet access is only possible through a NAT device (instance or Gateway), giving us controlled egress.
Important note: “Private” doesn’t automatically mean more secure. It simply means there is no direct route to the Internet. True security still depends on:
- Security group rules
- Network ACLs
- Internal firewall policies
Configuration rationale:
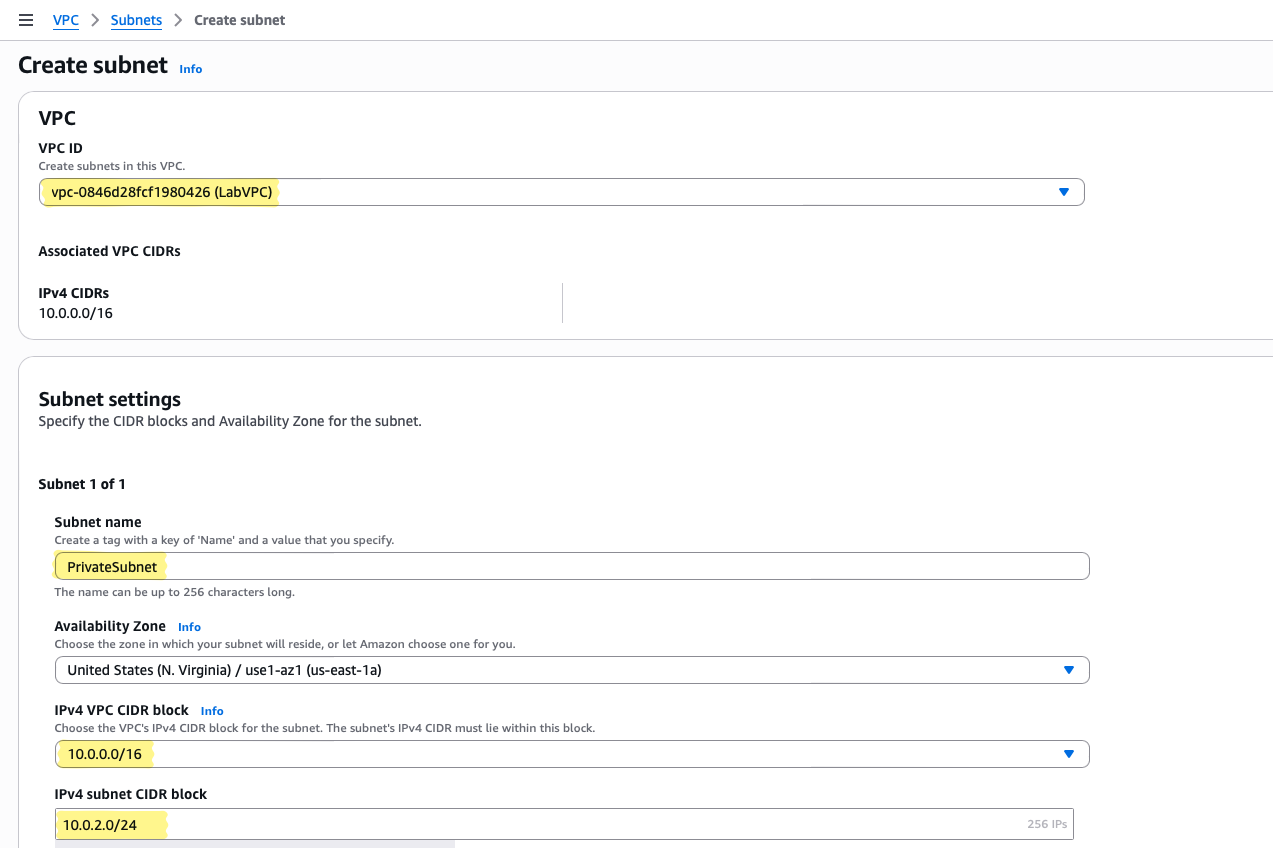
- VPC: The private subnet must belong to the VPC we just created (
LabVPC) - CIDR block:
10.0.2.0/24— another slice of our /16 VPC, logically separated from the public subnet - Availability Zone: Can match the public subnet or be in another AZ for high availability
Console Navigation:
- Go to VPC → Subnets → Create Subnet
- Select the LabVPC
- Name it
PrivateSubnet - Choose the Availability Zone
- Enter IPv4 CIDR block
10.0.2.0/24 - Click Create
💡 Tip: By keeping the public and private subnets in separate CIDR blocks , we make it easier to reason about routing.
Mental Model Check
- Public subnet: Can connect to and from the Internet (once IGW attached)
- Private subnet: Cannot connect to the Internet directly — traffic must flow through NAT
- Routing: Behavior is determined entirely by route tables; subnet labels (“public” vs “private”) are semantic until routes exist
At this stage, we’ve defined where resources live and what their default exposure is, but no actual connectivity exists yet. This lays the foundation for the next step: attaching Internet Gateways and NAT Gateways, which bring the network behaviour to life.
Step 3 – Create and Attach an Internet Gateway
Now that we have our public and private subnets defined, the next logical question is:
How do public subnet resources actually reach the Internet?
Enter the Internet Gateway (IGW). Think of it as a doorway between your VPC and the rest of the world. Without this doorway, your public subnet is like a front porch with no exit — fully defined, but traffic cannot flow out.
What an Internet Gateway Actually Does
An IGW is a horizontally scaled, redundant, AWS-managed device. Its purpose is simple:
- Translate internal private IP addresses to public IPs for outbound traffic
- Allow inbound traffic to reach instances with public IPs
💡 Key Insight:
Creating the IGW alone does not automatically make your public subnet resources accessible. You must explicitly update the route table for the subnet to direct Internet-bound traffic (0.0.0.0/0) to the IGW.
Configuration Rationale
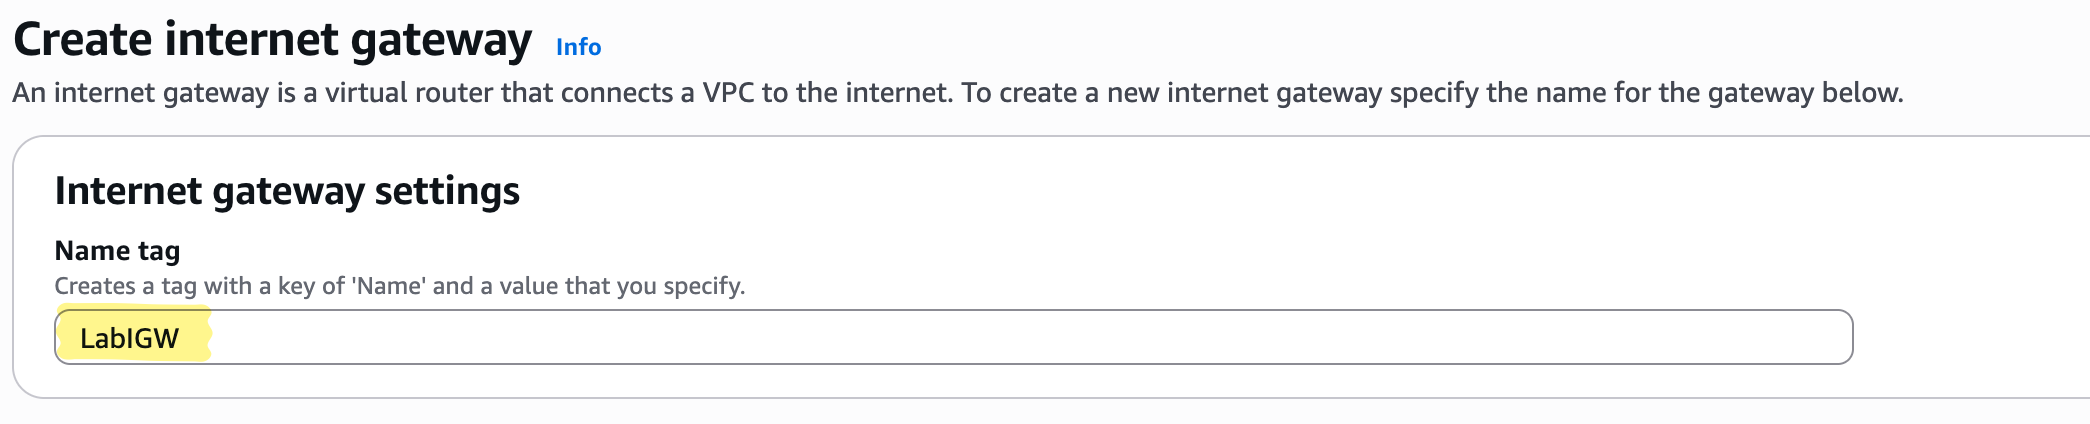
- Name:
LabIGW— a clear, consistent naming pattern that signals this is the IGW for our lab VPC - Attach to VPC:
LabVPC— every IGW exists in the context of a single VPC
By attaching the IGW to the VPC, you’re essentially saying, “This VPC now has an exit to the Internet.” But remember — traffic doesn’t flow until routing rules are defined.
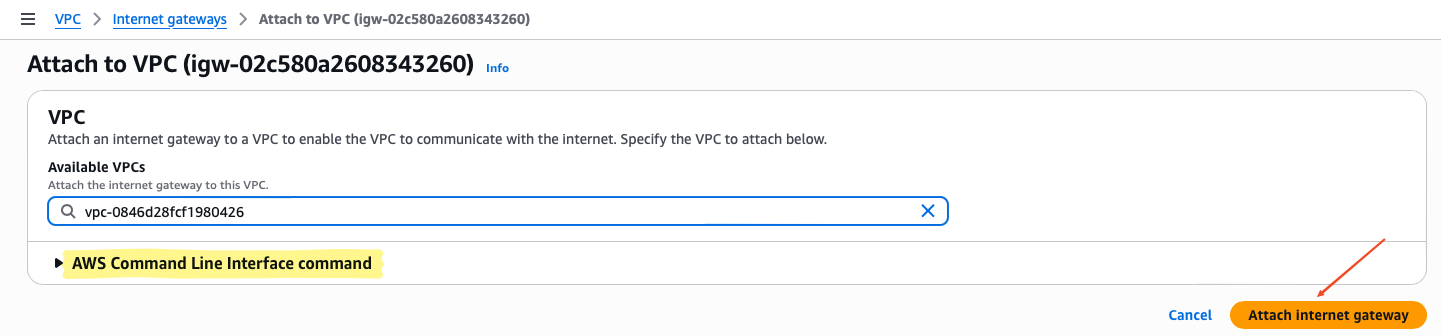
Console Navigation
Here’s how you create and attach an IGW without losing sight of the concept:
- Navigate to VPC → Internet Gateways → Create Internet Gateway
- Give it the name
LabIGW - Click Create
- Select the newly created IGW → Actions → Attach to VPC
- Choose LabVPC → Click Attach
Mental Model Check
- The IGW is like a gate; it doesn’t automatically send traffic anywhere.
- Without updating the public subnet’s route table, even an instance with a public IP cannot reach the Internet.
- Attaching an IGW is necessary but not sufficient for Internet access.
💡 Tip:
Always think in two steps for public connectivity:
- Attach an IGW to the VPC → creates the path to the Internet
- Update the public route table → tells resources “use this path for Internet-bound traffic”
Step 4 – Route Tables
At this point, we have a VPC, subnets, and an Internet Gateway. But having these pieces alone doesn’t make the network functional.
How does traffic actually know where to go?
That’s where route tables come in. In AWS, a route table is effectively the traffic director for each subnet — it decides which packets leave, which stay inside, and which never reach their destination.
Think of it as the traffic signals and maps for your network: without them, even a perfectly configured Internet Gateway (IGW) or NAT Gateway is useless.
Public Route Table – Enabling Internet Access
For resources in the public subnet, the route table must explicitly direct traffic destined for the Internet to the IGW.
Conceptual Intent:
- Resources with public IPs (like bastion hosts, load balancers, or NAT Gateways) need a clear path out.
- The route table is the mechanism that enforces this path.
Configuration Rationale:
- Name:
PublicRT— makes it obvious this route table governs public subnet behavior. - VPC:
LabVPC— associates it with the correct network boundary. - Route:
0.0.0.0/0 → LabIGW— directs all outbound Internet traffic to the IGW. - Subnet Association:
PublicSubnet— ensures only public subnet resources follow this routing logic.
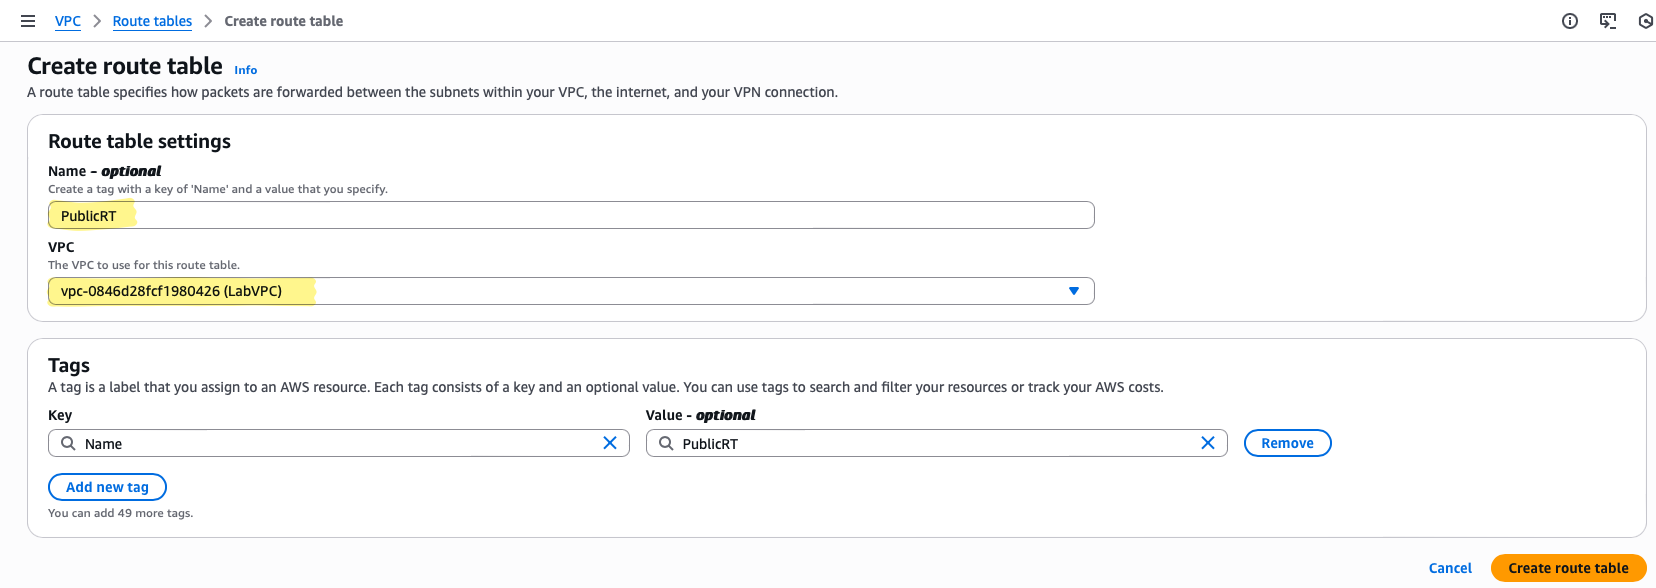
Console Navigation :
- Navigate to VPC → Route Tables → Create Route Table
- Name it
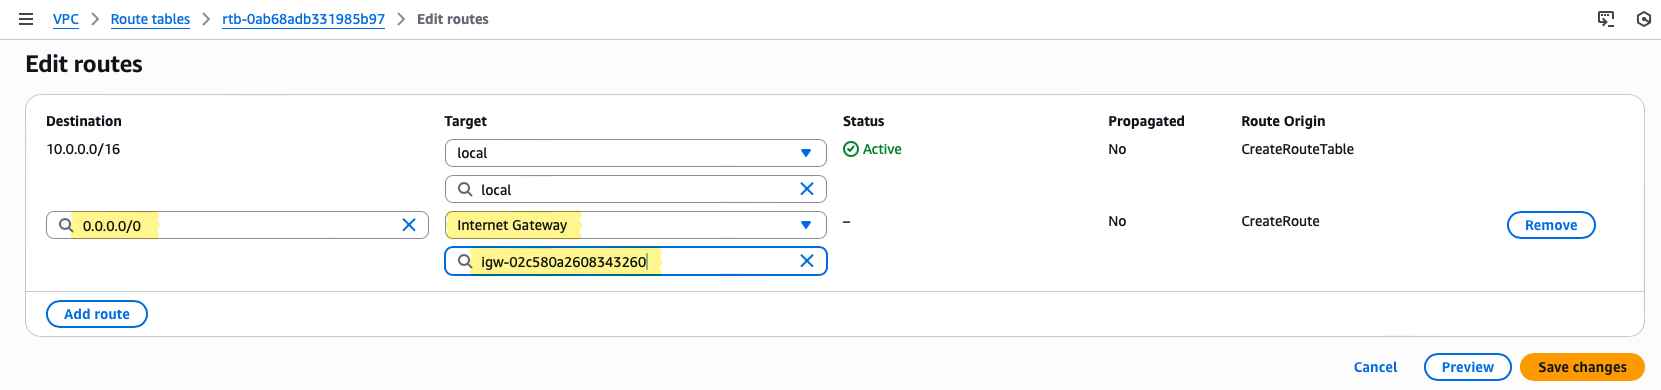
PublicRTand associate withLabVPC - After creation, select the route table → Routes → Edit routes → Add route
- Destination:
0.0.0.0/0→ Target:LabIGW - Associate with PublicSubnet under Subnet Associations

Private Route Table – Controlling Isolated Traffic
For the private subnet, the route table looks different. Initially, it has no route to the Internet — and that’s intentional.
Conceptual Intent:
- Private resources (databases, internal application servers) should be isolated from direct Internet access.
- Outbound connectivity will only occur through the NAT Gateway, which we’ll create in the next step.
Configuration Rationale:
- Name:
PrivateRT— clearly signals private subnet governance - VPC:
LabVPC - Routes: Local VPC only; no Internet route yet
- Subnet Association:
PrivateSubnet
💡 Why this matters:
Think of this as a segmented network: internal components can communicate freely, but nothing leaves without explicit permission. When we attach the NAT Gateway later, the private route table will be updated to create a controlled outbound Internet path, maintaining security while enabling necessary connectivity.
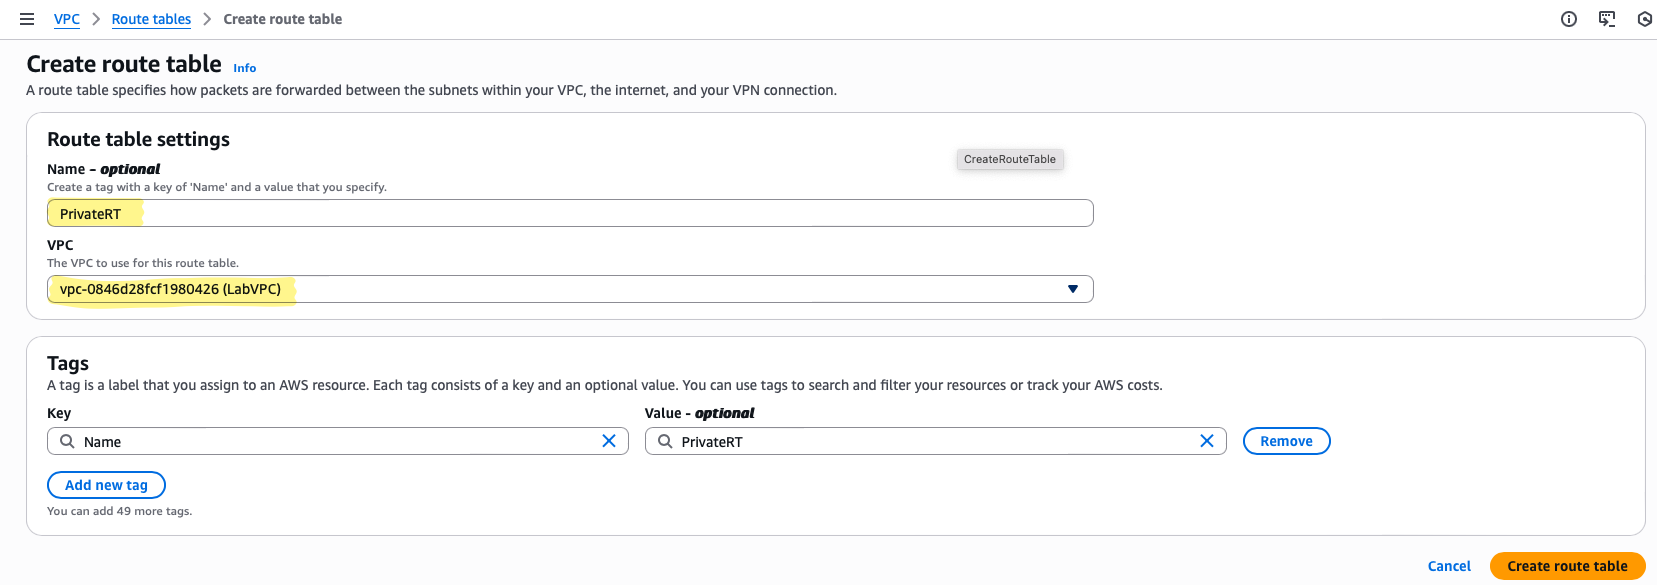
Console Navigation:
- Navigate to VPC → Route Tables → Create Route Table
- Name it
PrivateRTand associate withLabVPC - Ensure no default
0.0.0.0/0route exists for now - Associate with PrivateSubnet

Mental Model Check
- Public subnet → has a route to the IGW → can access Internet
- Private subnet → has no Internet route → completely isolated
- Route tables define behavior; subnets alone don’t determine connectivity
- Adding or removing routes is equivalent to opening or closing doors in your network
💡 Tip:
Always verify which subnet a route table is associated with. Misassociation is a common cause of connectivity issues — your public instance may remain “private” if the wrong route table is attached.
Step 5 – Create the NAT Gateway
At this point, we have our private subnet, but there’s a catch: instances there cannot reach the Internet. Why? Because they have no public IP and their route table doesn’t point anywhere external.
How do we give them outbound Internet access without exposing their IPs directly? That’s exactly the role of the NAT Gateway.
Think of it as a bridge or translator: your private instances send traffic out, the NAT Gateway rewrites the source IP to its own public IP, sends the traffic to the Internet, and returns responses back to the originating instance. AWS manages the “busy work” for you, so you don’t have to run a Linux NAT instance and configure forwarding manually.
Step 5a – Allocate an Elastic IP (The Gateway’s Public Face)
Before creating a NAT Gateway, we must allocate an Elastic IP (EIP) and associate it with the gateway. This step is not optional—and it plays a critical role in how outbound traffic from private subnets behaves.
A NAT Gateway must use a public, internet-routable IP address. The Elastic IP provides that address and ensures it remains static and predictable.
What Happens Without an Elastic IP?
If a NAT Gateway were allowed to use a dynamically assigned public IP:
- The outbound IP could change if the NAT Gateway is recreated
- External systems would see traffic coming from a new IP
- Any IP-based rules would break immediately
Console Navigation:
- Go to VPC → Elastic IP Addresses → Allocate Elastic IP
- Leave default settings and allocate
- Take note of this Elastic IP — it will represent all outbound traffic from private instances


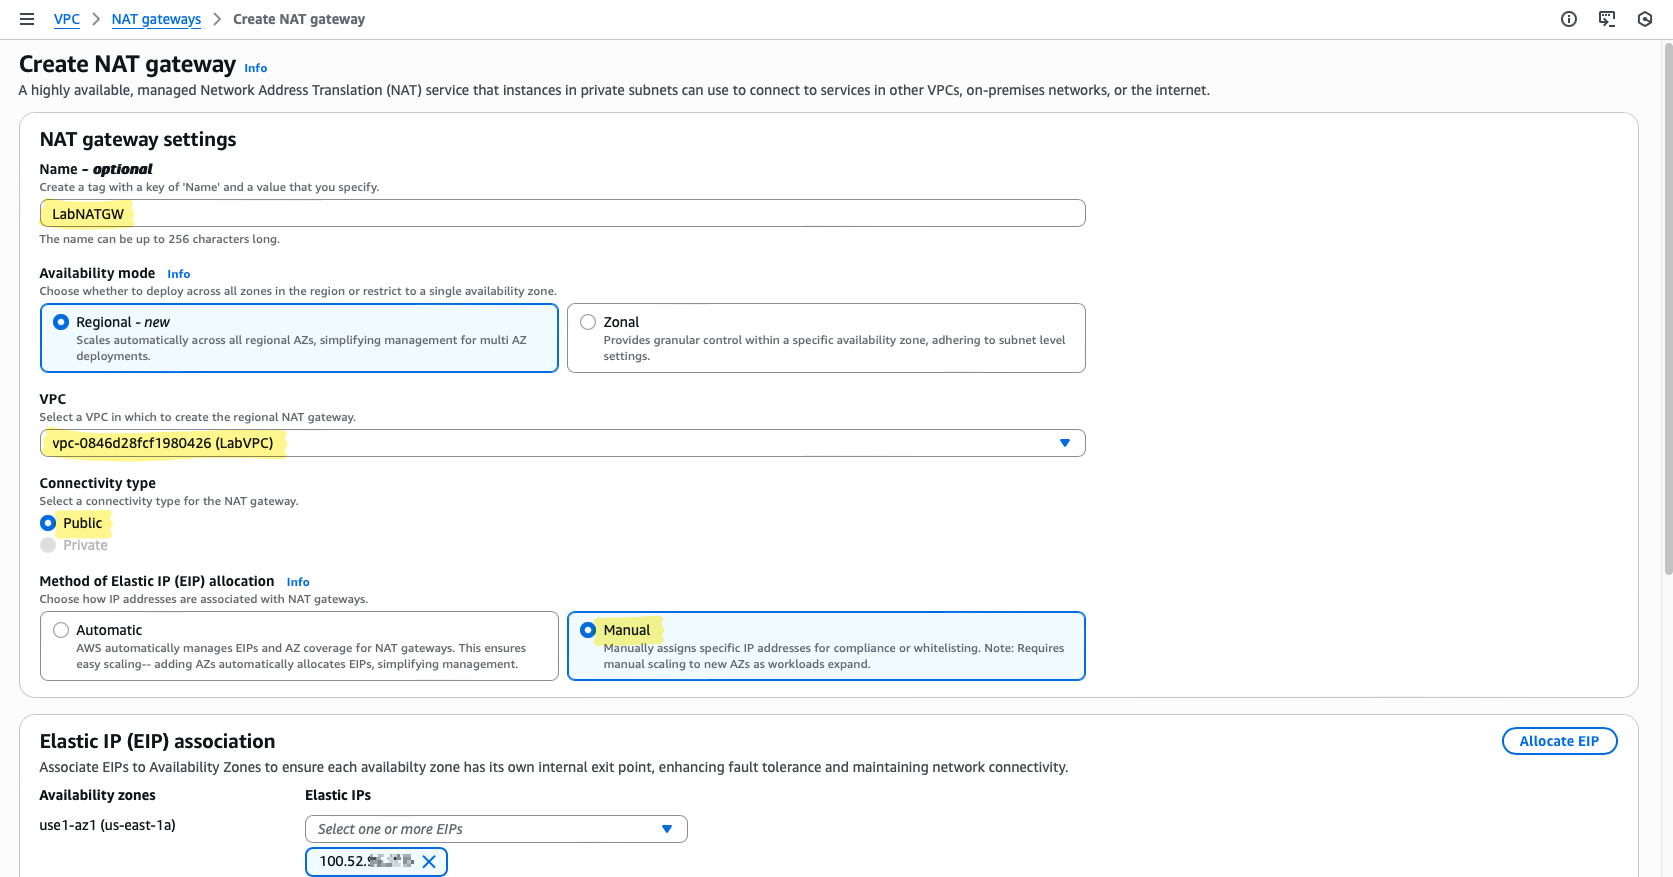
Step 5b – Create the NAT Gateway
Now we actually provision the NAT Gateway. Conceptually, this step is simple, but it’s where private subnet connectivity becomes real.
Console Navigation:
- Navigate to VPC → NAT Gateways → Create NAT Gateway
- Name it
LabNATGW— keep names descriptive to avoid confusion later - Subnet: choose PublicSubnet — a NAT Gateway must reside in a public subnet to reach the Internet
- Elastic IP: select the one you allocated in the previous step
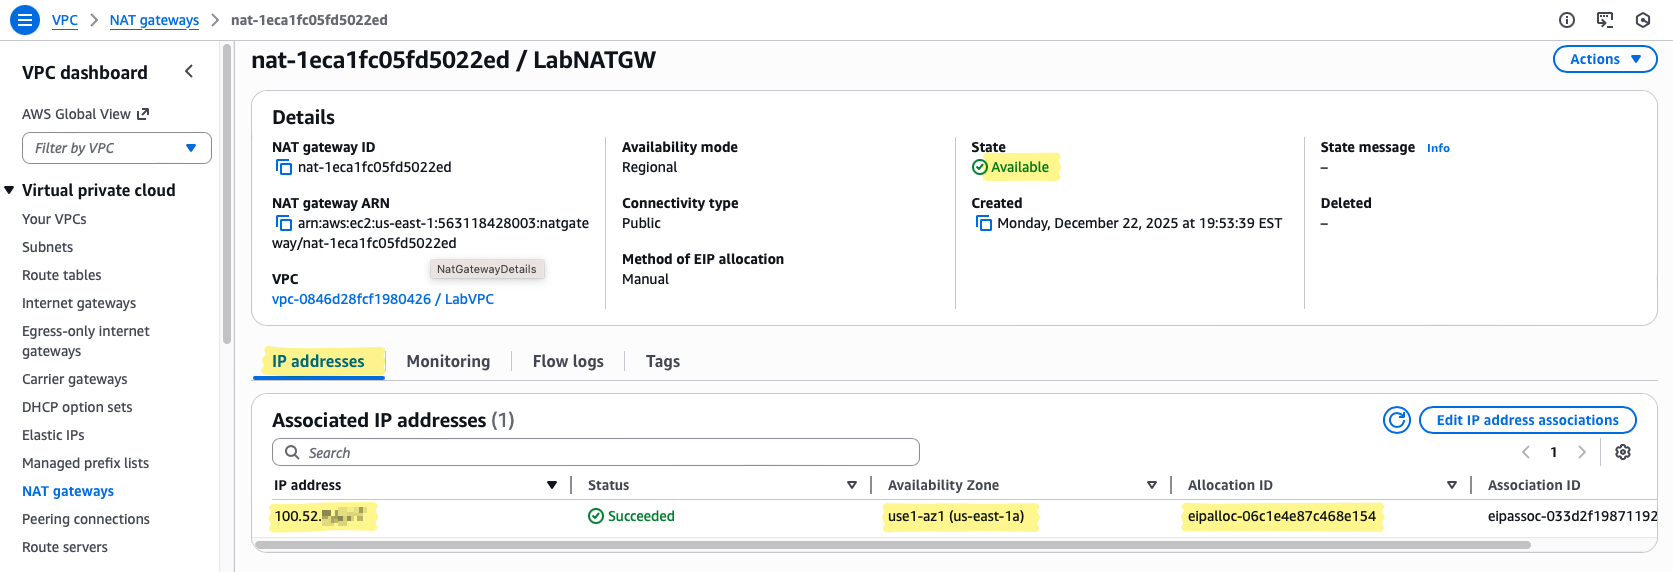
- Create and wait for the status to change from Pending → Available
💡 Why this matters:
- Without a NAT Gateway in a public subnet, private instances cannot leave the VPC
- Attaching the Elastic IP ensures outbound traffic uses a predictable, stable address
- The NAT Gateway is fully managed — no OS to patch, no firewall to configure, no IP forwarding to enable
Step 5c – Operational Relief (What You Don’t Have to Worry About)
If you remember the NAT instance lab, setting up NAT required:
- Disabling source/destination checks
- Enabling IP forwarding
- Configuring NAT rules and firewalls
- Patching the operating system
💡 Why this felt strange at first:
All of that is now handled inside the managed NAT Gateway service. The networking logic hasn’t disappeared — it’s just moved behind the AWS service boundary. Your private instances get Internet access without babysitting a host, dramatically reducing operational overhead.
Step 6 – Update the Private Route Table
Even though we now have a NAT Gateway, the private subnet still cannot reach the Internet. Why? Because route tables control traffic flow. Nothing leaves a subnet without an explicit route.
Think of the private route table as the traffic director: it decides whether packets stay local, go to another subnet, or exit through a gateway. Until we tell it to send outbound traffic to the NAT Gateway, private instances remain isolated.
Step 6a – Adding the Outbound Route
Console Navigation:
- Navigate to VPC → Route Tables → PrivateRT
- Select Routes → Edit routes → Add route
- Enter the following:
- Destination:
0.0.0.0/0(all Internet-bound traffic) - Target:
LabNATGW(your NAT Gateway)
- Destination:
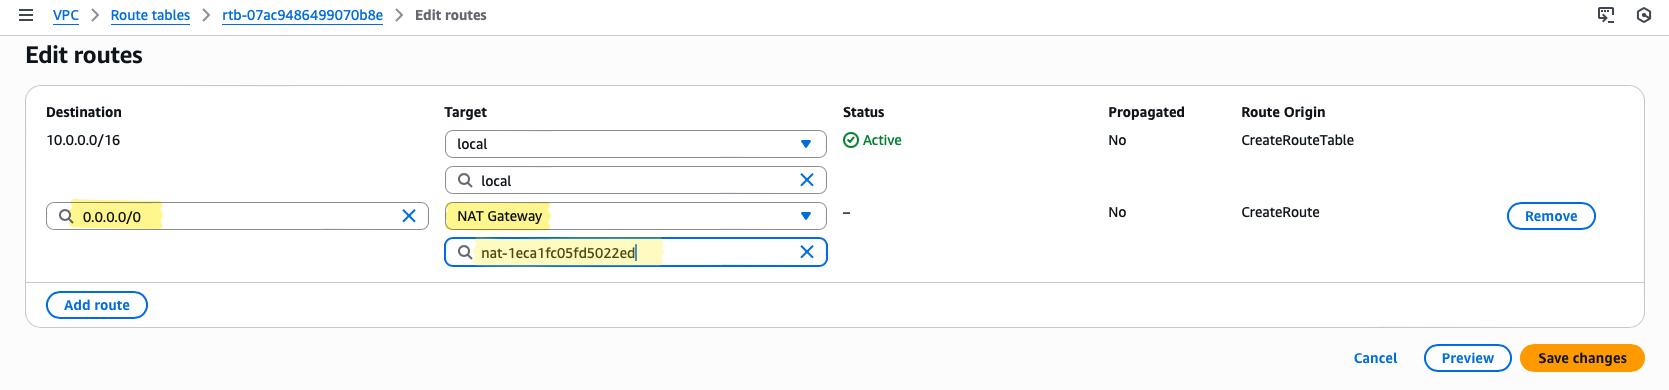
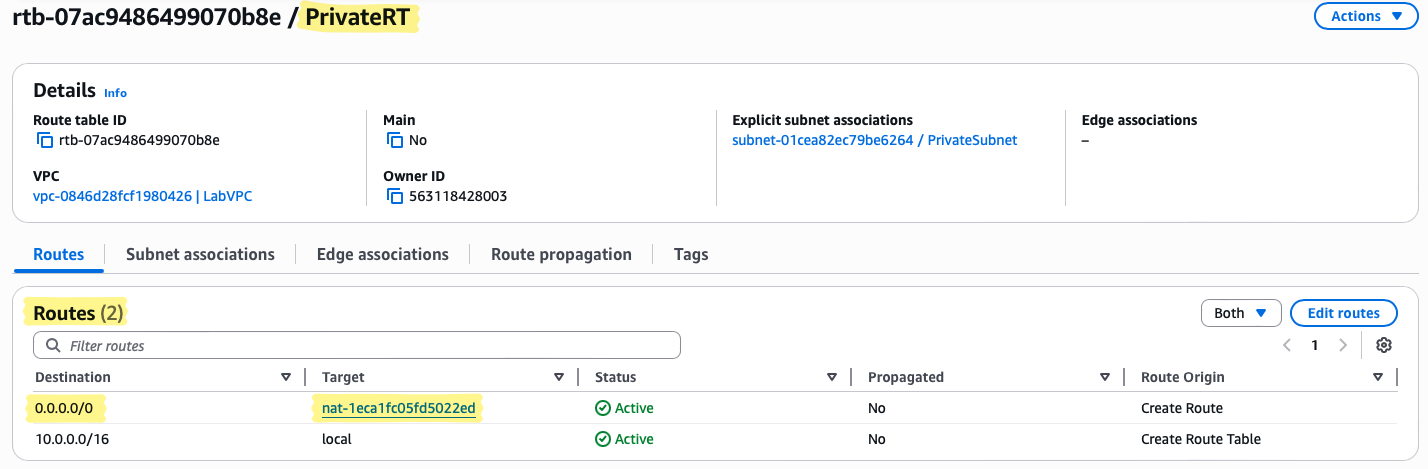
Once saved, this single route enables all private subnet instances to reach the Internet through the NAT Gateway.
💡 Why this matters:
- EC2 instances don’t make routing decisions.
- Subnets don’t make routing decisions.
- Route tables make the call.
- Viewing networking this way transforms troubleshooting from guessing to reasoning: if traffic isn’t flowing, check the route table first.
Step 6b – Mental Model Check
- NAT Gateway → rewrites source IP → traffic reaches the Internet
- Responses follow the same path back to the originating instance
This route is the critical bridge connecting your private subnet to the Internet safely and predictably.
💡 Pro Tip:
If you accidentally point the route elsewhere or skip this step, private instances remain “invisible” to the Internet — no updates, no API calls, nothing. Always validate with a test instance using curl http://checkip.amazonaws.com to confirm the NAT Gateway’s Elastic IP is being used.
Step 7 – Launch EC2 Instances
Now that the network is ready — VPC, subnets, IGW, NAT Gateway, and route tables — it’s time to bring the traffic to life with EC2 instances. This is where the concepts of public vs private and routing intent start behaving visibly.
💡 Speed Note:
I’m going to speed up the EC2 creation details here. For a full walkthrough of instance launch options, AMI selection, and instance settings, check out Blog 2 .
Also, don’t forget to create a key pair while creating an AWS Ec2 instance. You’ll need this .pem file to SSH into your instances later. Without it, you won’t be able to access the instances, so save it somewhere safe.
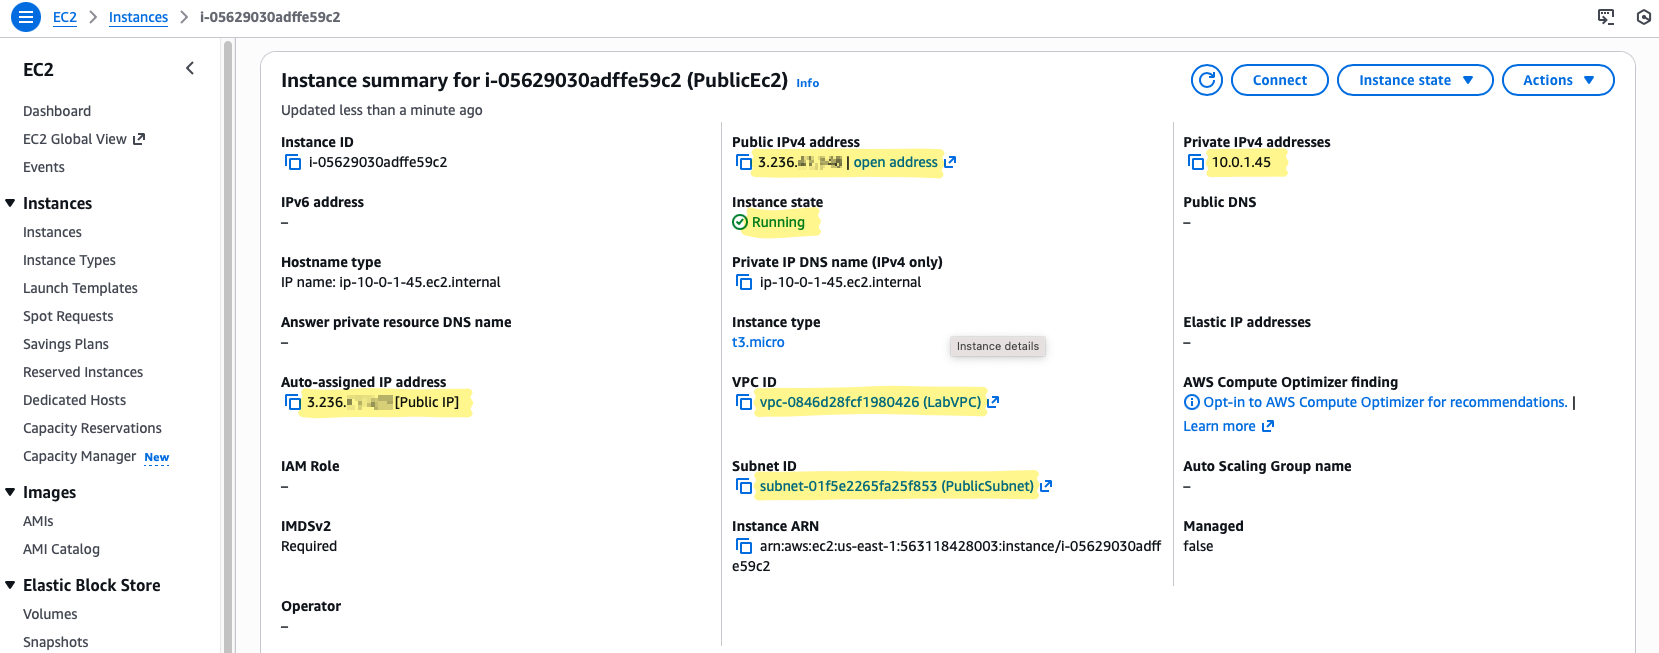
Public EC2
For the public instance, the goal is simple: direct Internet access. This instance will also act as a jump host for reaching private resources later.
Key Settings for the Lab:
- Instance Type:
t3.micro— sufficient for lab testing, low cost, and easy to experiment with. - Subnet:
PublicSubnet— ensures it has a route to the Internet through the IGW. - Auto-assign Public IP: Enabled — gives it a reachable IP without manual Elastic IP setup.
- Security Group: Allow SSH (port 22) only from your home IP — restricts access and prevents random exposure.
- Name:
PublicEC2— descriptive so you know its role.

💡 Why this matters:
A public instance is directly reachable from the Internet, but still controlled. It’s your window into the VPC, and later it will serve as the bridge to private resources.
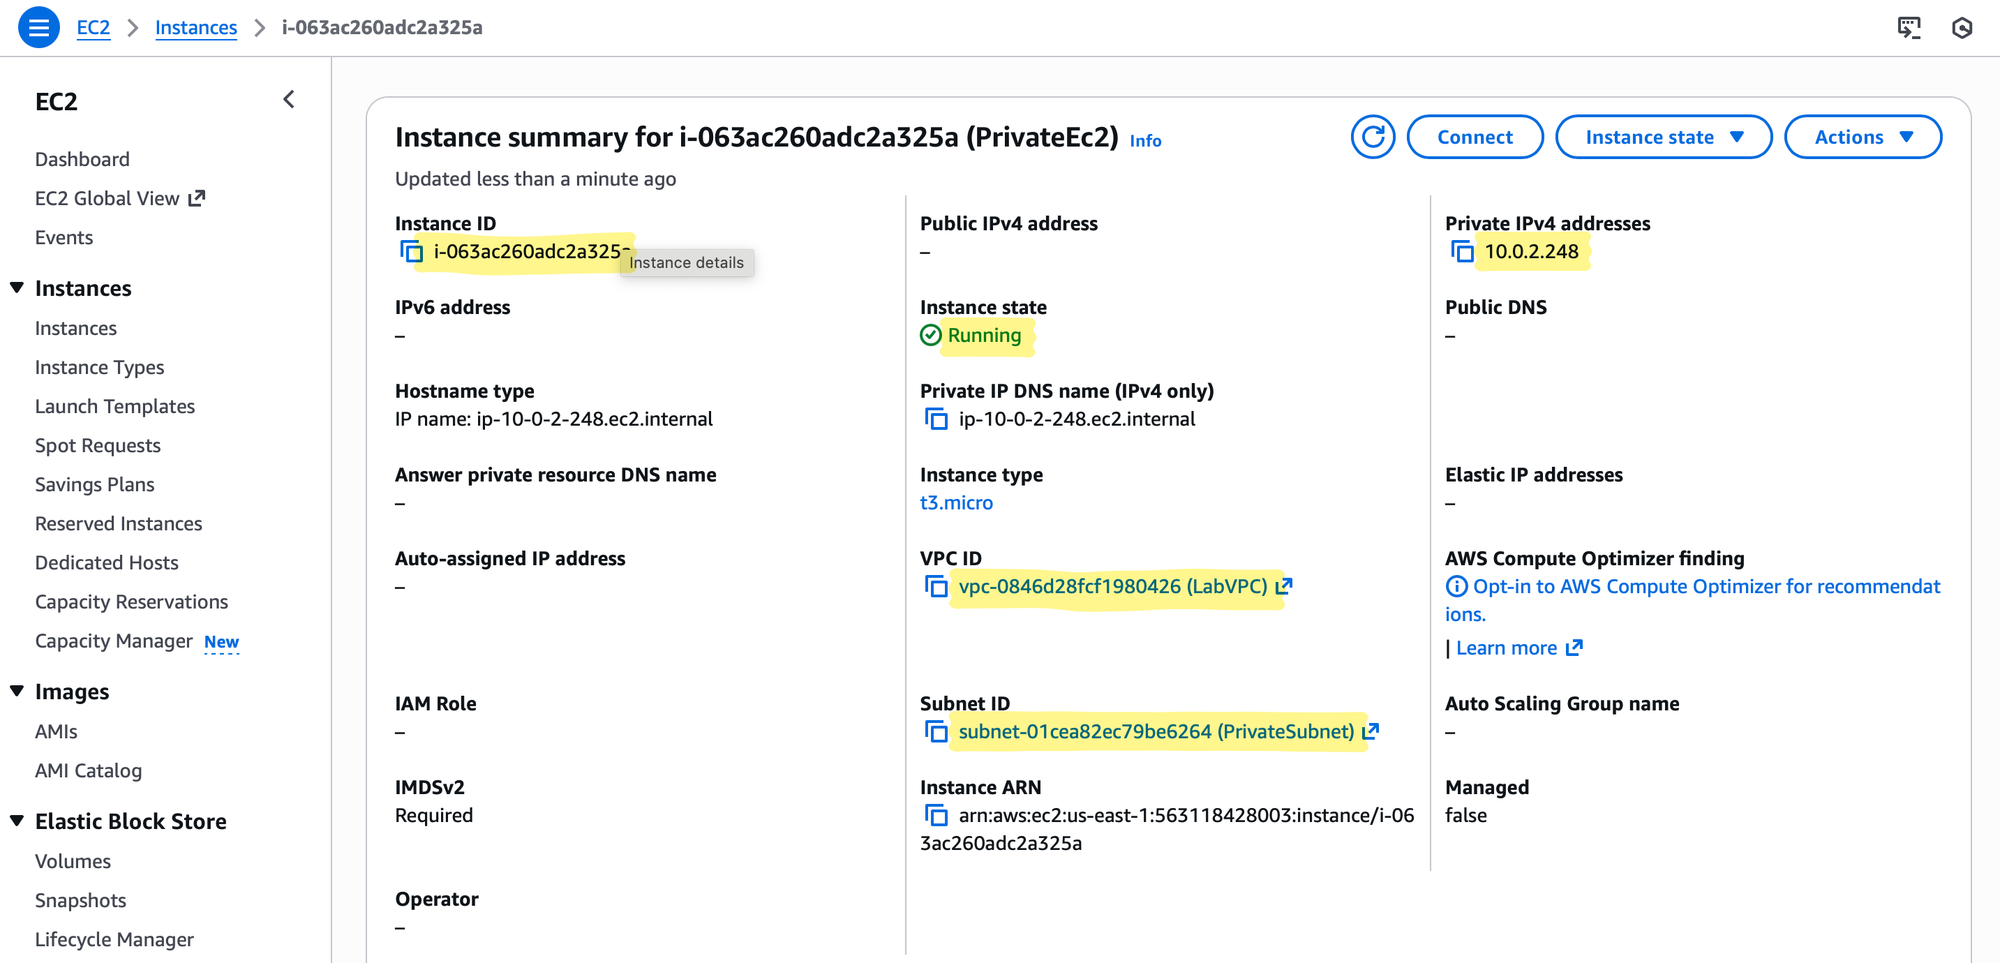
Private EC2
The private instance demonstrates why private subnets exist: isolated from direct Internet exposure, yet still capable of outbound connectivity through the NAT Gateway.
Key Settings for the Lab:
- Instance Type:
t3.micro— same reasoning as above. - Subnet:
PrivateSubnet— intentionally isolated; no direct Internet route. - Auto-assign Public IP: Disabled — keeps it truly private.
- Security Group: Allow SSH only from
PublicEC2Security group — no hardcoded IPs, controlled access.
To use the public EC2 instance as a jump box for accessing private instances, we reference the jump box’s security group instead of whitelisting IPs. This ensures only traffic originating from the jump box is allowed.This approach is dynamic, secure, and maintenance-free—even if the jump box is replaced or its IP changes, private instance access continues to work without modifying rules.
- Name:
PrivateEC2— role clarity again.

Mental Model Check
- PublicEC2: Can talk to the Internet directly, serves as a bridge.
- PrivateEC2: Cannot talk to the Internet directly, relies on NAT Gateway for outbound traffic.
- Security Flow: Private instances never expose themselves publicly, yet remain fully functional for updates, API calls, and controlled SSH access via the jump host.
This step transforms abstract routing concepts into visible, testable behaviour, reinforcing why we defined the VPC, subnets, and gateways exactly as we did.
Step 8 – Testing Connectivity
Now comes the moment where all your networking decisions actually show visible behavior. This is where your mental model clicks — you see why public vs. private subnets, route tables, and the NAT Gateway matter.
Public EC2 (Direct Internet Access)
First, we test that the public instance can talk to the outside world through the Internet Gateway.
- Access the instance from your local machine using the public key pair you created earlier:
ssh -i public-keypair.pem ec2-user@<public-ip-of-instance>
💡 Tip: Make sure your key file is secure locally. If needed, set the correct permissions:
chmod 400 public-keypair.pem
This ensures that only your user can read the key, which SSH requires for security.
- Test connectivity once logged in:
ping 8.8.8.8
curl http://checkip.amazonaws.com
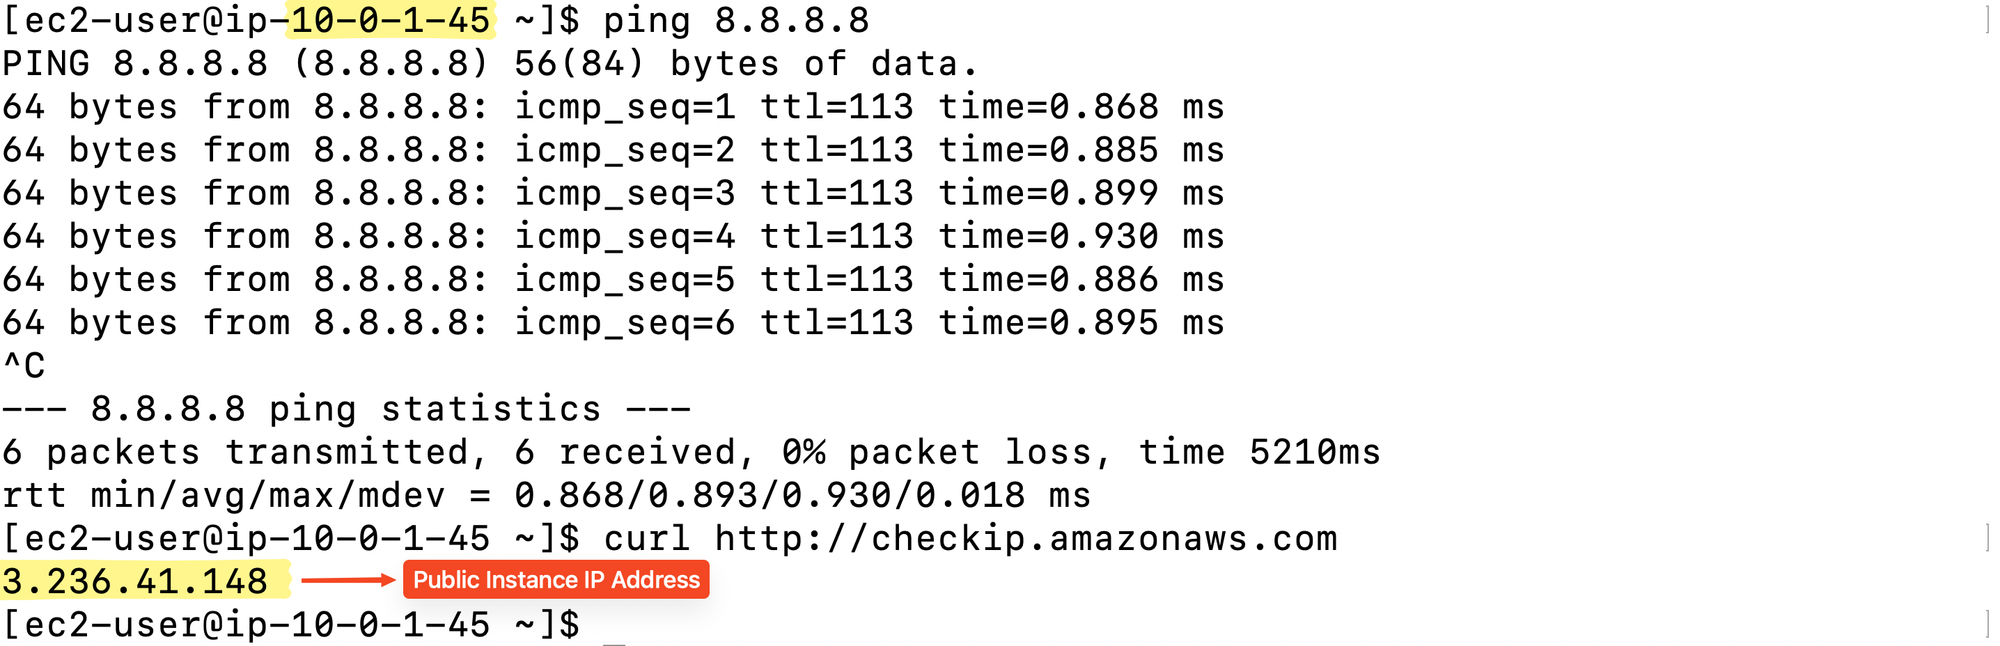
pingverifies basic ICMP reachability.curlreturns the instance’s public IP, confirming it has direct Internet access through the Internet Gateway(IGW).
You should see responses from both commands. This proves that your public subnet, IGW, and route table are all functioning as intended.
Private EC2 (Outbound via NAT Gateway)
Next, we test the private instance — still isolated from the Internet directly, but able to initiate outbound connections through the NAT Gateway.
- Copy the private key to the public EC2:
scp -i public-keypair.pem private-keypair.pem ec2-user@<public-ec2-public-ip>:/home/ec2-user/
- SSH into the public EC2:
ssh -i public-keypair.pem ec2-user@<public-ec2-public-ip>
3. Prepare the private key for use on the public EC2:
chmod 400 private-keypair.pem
💡 Why chmod 400 matters:
SSH requires that your private key file is only readable by your user. Without this, SSH will refuse to use the key. This applies to both local access to public EC2 and private access from the jump host. It’s a critical step to avoid frustrating “permission denied” errors.
- SSH into the private EC2 using its private IP:
ssh -i private-keypair.pem ec2-user@<private-ec2-private-ip>
- Test outbound connectivity from the private instance:
ping 8.8.8.8
curl http://checkip.amazonaws.com

pingconfirms basic reachability.curlwill return the Elastic IP of the NAT Gateway, proving that outbound traffic is properly routed through the NAT.
💡 Why this matters:
This validates the essence of a private subnet with a NAT Gateway:
- Instances can access external resources (updates, APIs, etc.)
- They remain completely isolated from inbound Internet connections
- Security is maintained, while operational functionality is preserved
This step is the first real proof that your routing and NAT configuration works — a satisfying moment that confirms the theory matches the behaviour.
Summary
In this lab, we’ve seen how public subnets route traffic through an Internet Gateway (IGW) for direct Internet access, while private subnets rely on a NAT Gateway to initiate outbound connections without being exposed to the outside world. NAT Gateways simplify operations compared to NAT instances — there’s no patching, no source/destination checks, and no OS-level management required.
One key lesson is that routing, not individual EC2 settings, dictates how traffic flows. Just because a subnet is private doesn’t mean its instances are disconnected; they can safely reach external resources like updates or APIs through the NAT Gateway. Completing both the NAT instance and NAT Gateway labs turns AWS networking from abstract concepts into a predictable, understandable system, where you can reason about traffic flow with confidence.